Burning an ISO file to a USB drive is a common task for anyone who works with computers. Whether you are creating a bootable USB for installing a new operating system or transferring files, having a reliable method to burn ISO to USB is essential. While there are many tools available for Windows users, Mac users often face a challenge in finding the right solution. In this blog post, we will explore five different methods to burn Windows ISO to USB on Mac, along with their pros and cons.
The ability to write ISO files to USB drives directly on a Mac is not built-in to the operating system. This limitation can be frustrating for users who want a simple and straightforward solution. Additionally, many of the tools available online are not compatible or reliable. Therefore, finding the right method that works seamlessly on a Mac becomes crucial. In this blog post, we will not only explore different ways to burn ISO to USB on Mac but also discuss their advantages and disadvantages to help you make an informed decision.
The Challenge of Burning ISO Files to USB on Mac
Burning ISO files to a USB drive on a Mac is different from simply copying the file to the drive. Instead, the ISO contents need to be extracted and written in a way that makes the USB drive bootable (if the ISO is meant to be a bootable image). Burning an ISO file to a USB drive on a Mac presents several challenges, particularly for users who might be used to simpler or more direct methods on other platforms. Here’s a list of the challenges involved:
- No Native macOS Tool for Direct ISO Burning: Unlike some operating systems, macOS does not come with a built-in utility specifically designed for burning ISO files to USB drives.
- Data Loss: The process usually involves completely erasing the USB drive, which means any existing data will be lost.
- Complex Terminal Commands: For many users, using the Terminal can be intimidating. The command-line approach is powerful but can be confusing and is unforgiving with mistakes.
- Risk of Overwriting Wrong Drive: If you’re not careful with the Terminal commands, there’s a risk of overwriting the wrong drive. This can lead to data loss on other drives or partitions.
- File System Compatibility: Depending on the destination device’s needs (e.g., a Mac vs. Windows PC boot), you might need to ensure the correct file system is set on the USB drive.
Why Can’t Copy ISO Files to USB Directly?
- The ISO file format is an image file that contains all the contents of a CD or DVD, including file system and boot information. Copying the ISO file to a USB drive as a regular file will not make the USB bootable.
- ISO files are typically larger than the maximum file size limit for the FAT32 file system used by most USB drives. Therefore, copying the ISO file directly to the USB drive may result in incomplete or corrupted data.
- The bootable USB drive needs to have a specific file structure and bootloader in order to be recognized as bootable. Simply copying the ISO file to the USB drive will not create this structure.
Method 1: Copy ISO to USB on Mac using Terminal
Burning ISO to USB on Mac using Terminal is a command-line method that requires specific commands to execute the task. This method is suitable for users who are familiar with the Terminal app and comfortable using command-line interfaces. Follow the steps below to burn ISO to USB on Mac using Terminal:
Steps:
Step 1. Connect the USB drive to your Mac.
Step 2. Launch the Terminal app from the Applications > Utilities folder.
Step 3. Type the command "diskutil list" and press Enter to view the list of connected disks.

Step 4. Identify the disk number of your USB drive from the list.
Step 5. Type the command "diskutil unmountDisk /dev/diskX" (replace X with the disk number of your USB drive) and press Enter to unmount the USB drive.
Step 6. Type the command "sudo dd if=/path/to/isofile.iso of=/dev/rdiskX bs=1m" (replace /path/to/isofile.iso with the path to your ISO file and X with the disk number of your USB drive) and press Enter to start the burning process.
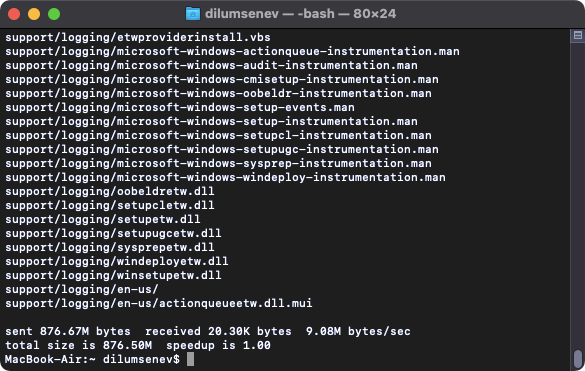
Step 7. Enter your administrator password when prompted and press Enter.
Step 8. Wait for the Terminal to complete the burning process. This may take a few minutes depending on the size of the ISO file.
Once the process is complete, you will have a bootable USB drive with the ISO file burned onto it.
| Pros | Cons |
|---|---|
| 1. No need to download additional software. | 1. Command-line interface may be intimidating for novice users. |
| 2. Provides precise control and customization options. | 2. Requires manual input of commands, which increases the chance of error. |
| 3. Works with all types of ISO files. | 3. May not be the most user-friendly method for beginners. |
Method 2: Burn ISO to USB on Mac using SYSGeeker WonderISO
SYSGeeker WonderISO is a user-friendly software that provides an easy-to-use interface for burning ISO files to USB on Mac. This method requires a third-party software download, but it simplifies the process for users who prefer a graphical interface. Follow the steps below to burn ISO to USB on Mac using SYSGeeker WonderISO:


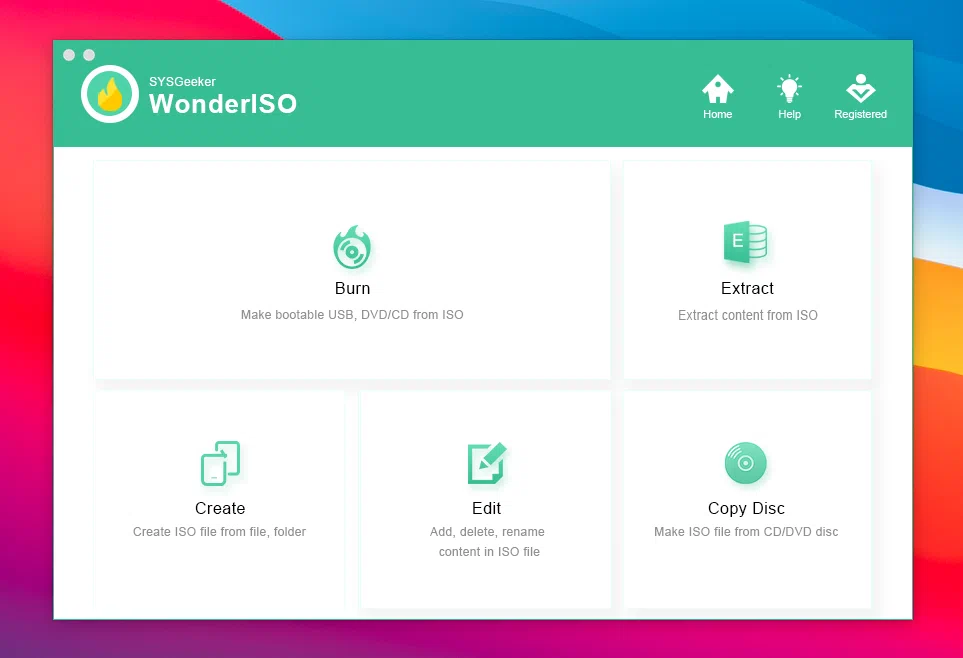
Step 1. Download and install SYSGeeker WonderISO on your Mac. Launch the software and click on the "Burn" tab.
Step 2. Click on the "Add" button to select the ISO file from your local storage. Select the USB drive from the "Destination" dropdown menu.
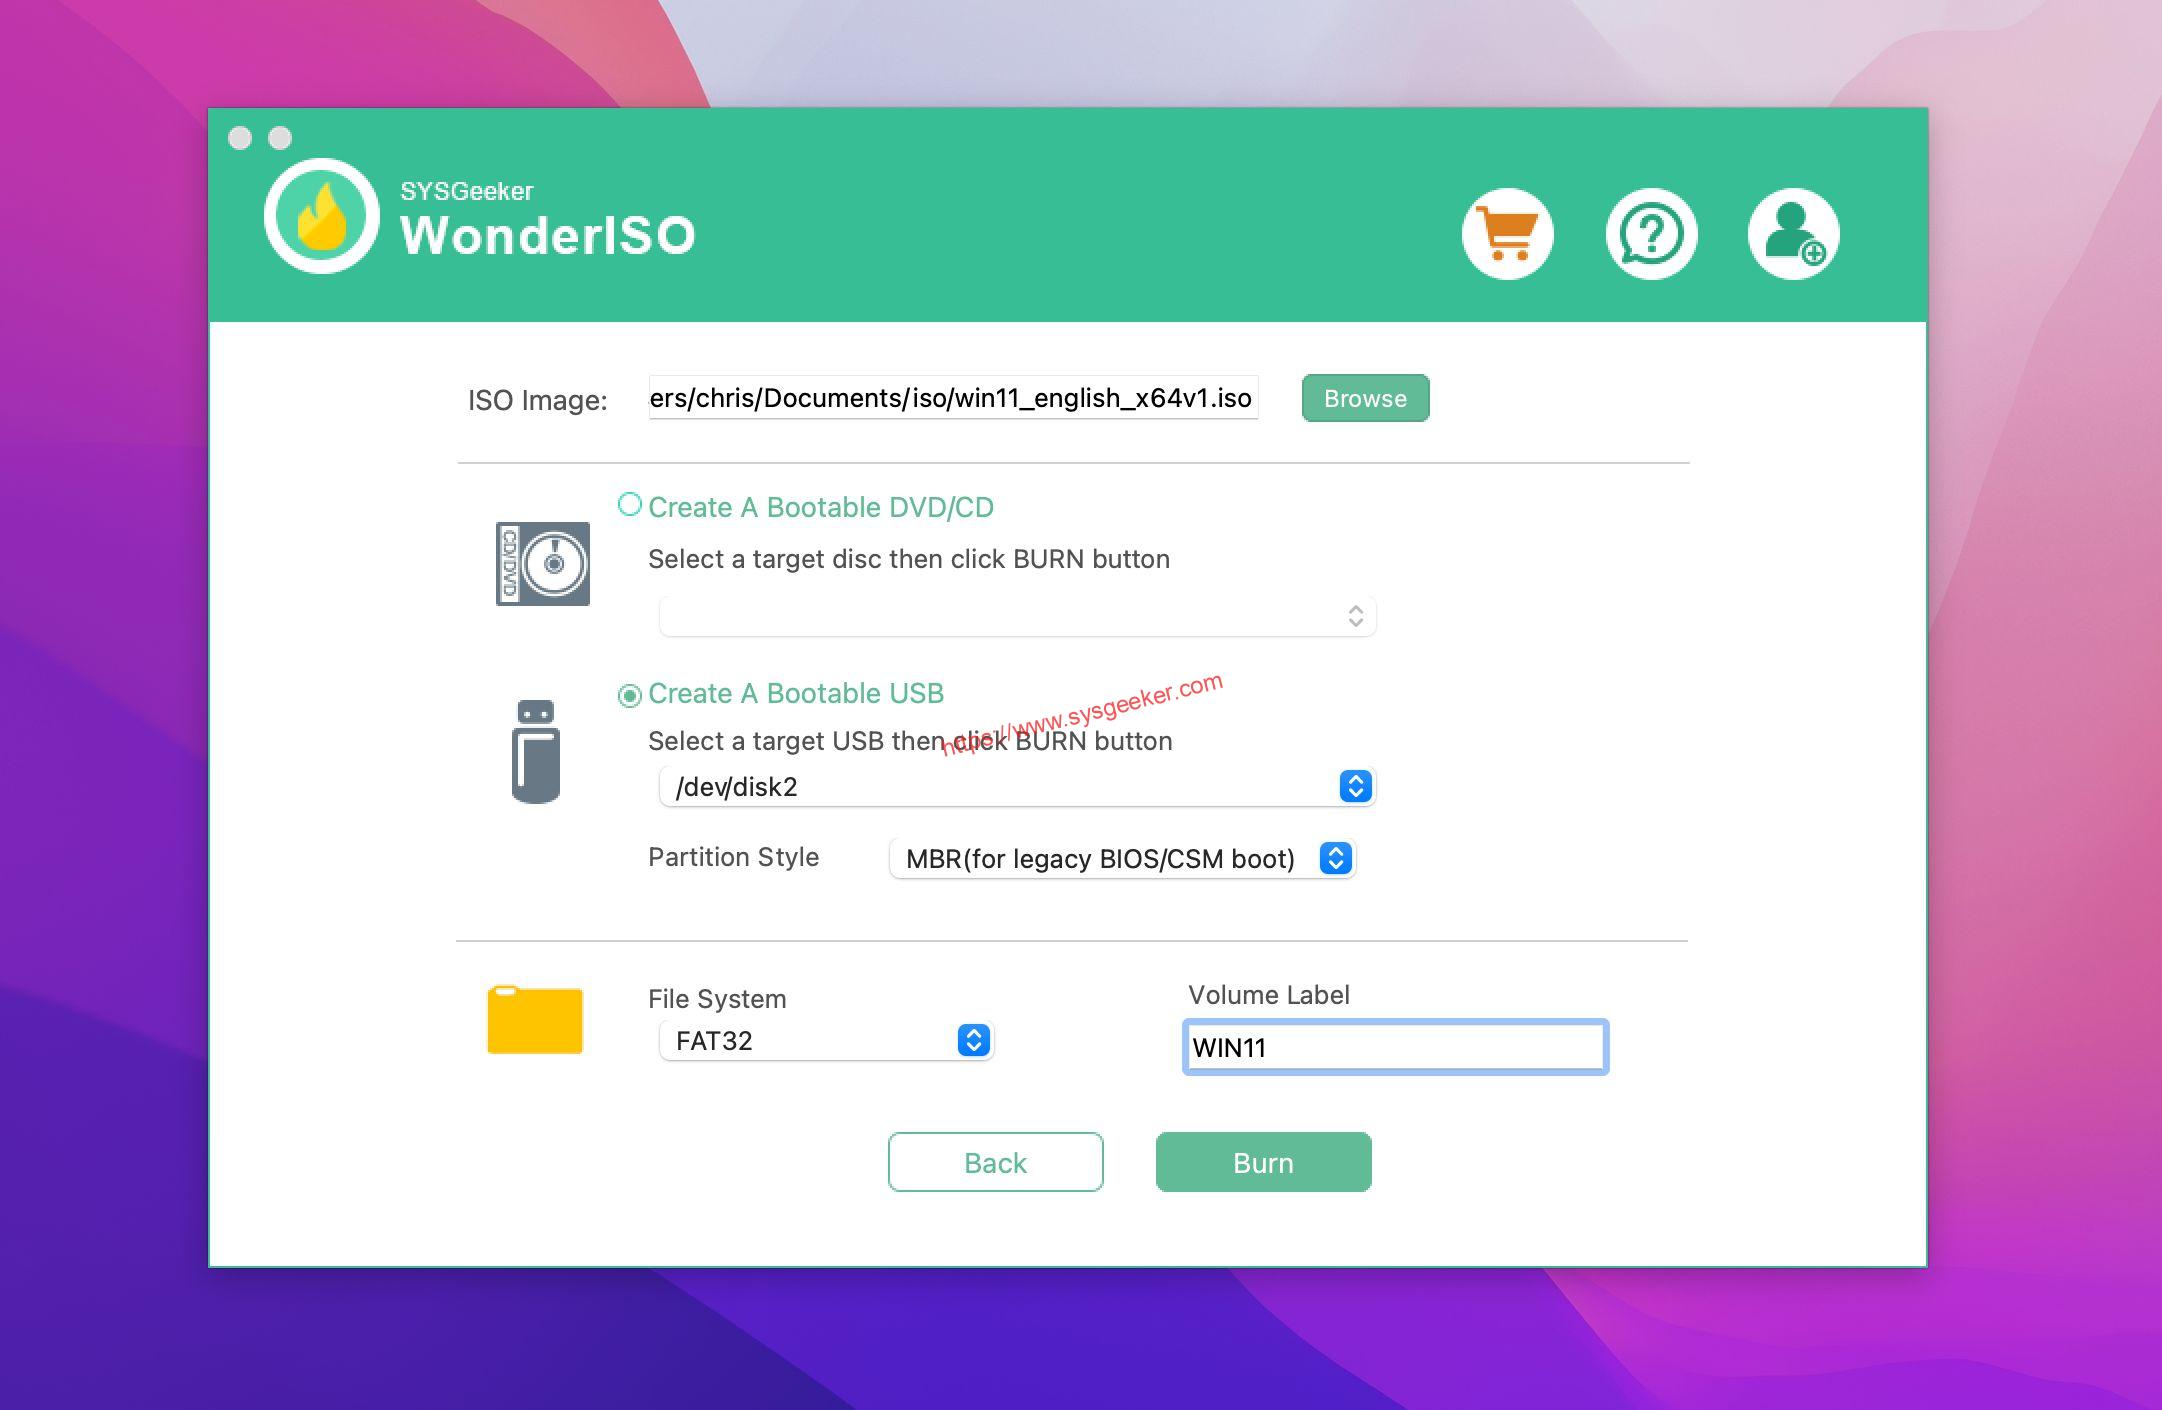
Step 3. Click on the "Burn" button to start the burning process.
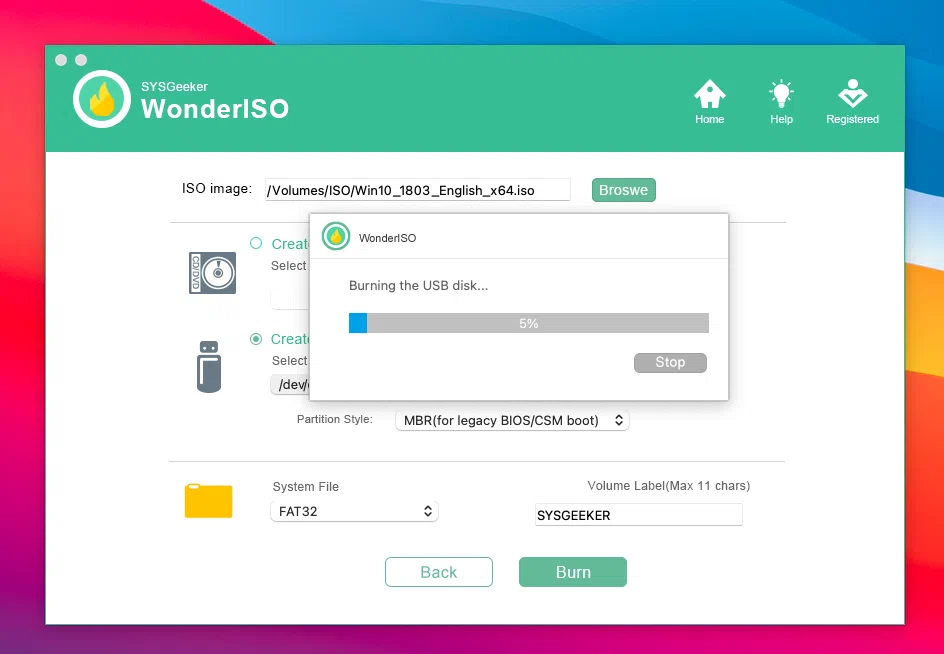
Step 4. Wait for the software to complete the burning process. This may take a few minutes depending on the size of the ISO file. Once the process is complete, you will have a bootable USB drive with the ISO file burned onto it.
| Pros | Cons |
|---|---|
| 1. User-friendly interface with graphical elements. | 1. Requires downloading and installing third-party software. |
| 2. Simplifies the process for beginners and novice users. | 2. Limited customization options compared to Terminal method. |
| 3. Supports various ISO formats and USB drives. | 3. May not work with certain ISO files or USB drives. |
Video Tutorial:
Method 3: Burn ISO to USB on Mac using UNetbootin
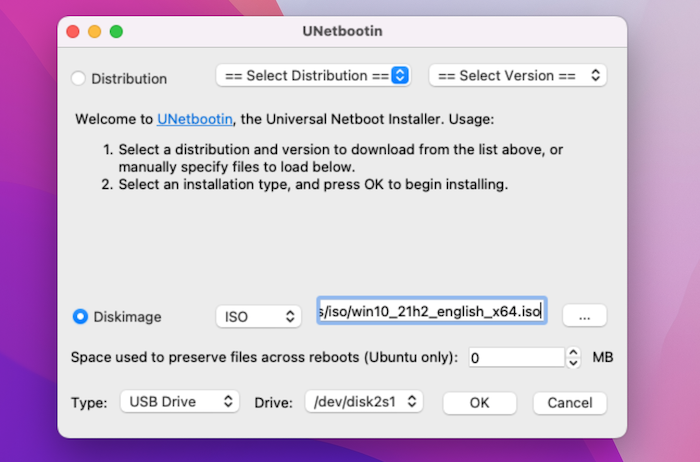
UNetbootin is a popular cross-platform software that allows users to create bootable USB drives from various ISO files. While primarily designed for creating Linux bootable USB drives, UNetbootin can also be used to burn Windows ISO files to USB on Mac. Follow the steps below to burn ISO to USB on Mac using UNetbootin:
Steps:
- Download and install UNetbootin on your Mac.
- Launch UNetbootin and select the ISO file option.
- Click on the "…" button to browse and select the ISO file from your local storage.
- Connect the USB drive to your Mac.
- Select the USB drive from the "Drive" dropdown menu.
- Click on the "OK" button to start the burning process.
- Wait for UNetbootin to complete the burning process. This may take a few minutes depending on the size of the ISO file.
- Once the process is complete, you will have a bootable USB drive with the ISO file burned onto it.
| Pros | Cons |
|---|---|
| 1. Cross-platform compatibility. | 1. May not work with all ISO files or USB drives. |
| 2. Provides an easy-to-use interface with customization options. | 2. Requires downloading and installing third-party software. |
| 3. Supports various ISO formats and USB drives. | 3. Limited support for Windows ISO files compared to Linux ISO files. |
Method 4: Write ISO to USB on Mac using Virtualbox
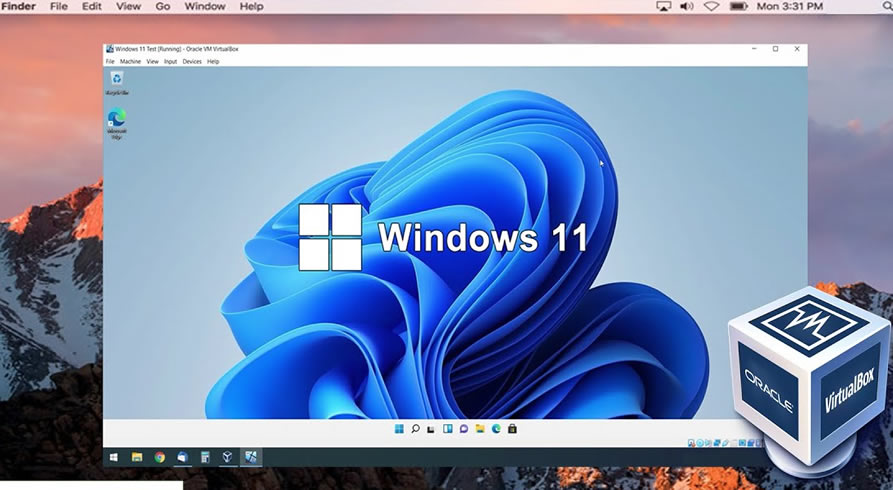
Virtualbox is a powerful and versatile virtualization software that allows users to run multiple operating systems on a single Mac. While primarily used for virtualization purposes, Virtualbox can also be utilized to burn ISO files to USB drives. Follow the steps below to Write ISO to USB on Mac using Virtualbox:
Steps:
- Download and install Virtualbox on your Mac.
- Launch Virtualbox and create a new virtual machine.
- Select the desired operating system for the virtual machine.
- During the virtual machine setup, select the ISO file as the virtual CD/DVD drive.
- Connect the USB drive to your Mac.
- In the virtual machine settings, enable USB passthrough for the USB drive.
- Start the virtual machine and boot from the ISO file.
- Once the virtual machine is booted into the ISO file, follow the regular Windows installation process.
- Select the USB drive as the installation target when prompted.
- Continue with the Windows installation process as usual.
| Pros | Cons |
|---|---|
| 1. Utilizes virtualization capabilities of Virtualbox. | 1. Requires downloading and installing Virtualbox. |
| 2. Suitable for users who regularly use Virtualbox for virtualization. | 2. Requires more steps and technical knowledge compared to other methods. |
| 3. Allows running multiple operating systems on a single Mac. | 3. May not be the most efficient method solely for burning ISO to USB. |
Method 5: Burn ISO to USB on Mac using Echter
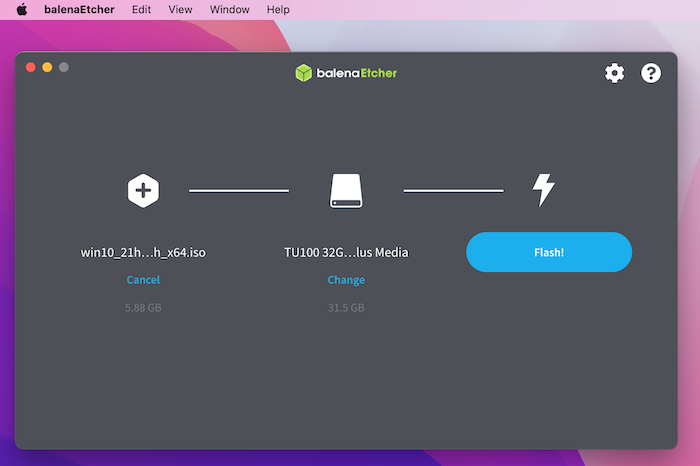
Echter is a recently introduced software that specializes in burning ISO files to USB drives on Mac. It offers an intuitive interface and streamlined process for users to quickly and easily create bootable USB drives. Follow the steps below to burn ISO to USB on Mac using Echter:
Steps:
- Download and install Echter on your Mac.
- Launch the software and click on the "Burn ISO" option.
- Click on the "Choose" button to select the ISO file from your local storage.
- Connect the USB drive to your Mac.
- Select the USB drive from the available options.
- Choose the "Start" option to begin the burning process.
- Wait for Echter to complete the burning process. This may take a few minutes depending on the size of the ISO file.
- Once the process is complete, you will have a bootable USB drive with the ISO file burned onto it.
| Pros | Cons |
|---|---|
| 1. Simple and user-friendly interface. | 1. Echter is a relatively new software which may lack comprehensive support. |
| 2. Streamlined process for burning ISO file to USB on Mac. | 2. May have limited customization options compared to other methods. |
| 3. Works with various ISO formats and USB drives. | 3. Requires downloading and installing third-party software. |
Alternatives: What to Do If You Can’t Burn ISO to USB on Mac
If you are unable to successfully burn ISO image file to USB on Mac using the methods mentioned above, there are a few alternative solutions you can consider:
1. Use a different computer:
If you have access to a Windows computer, you can use tools like Rufus or Windows USB/DVD Download Tool to create a bootable USB drive from the ISO file. Once the USB drive is created, you can use it on your Mac for installation or file transfer purposes.
2. Create a virtual machine:
If you have a virtualization software like Virtualbox or Parallels installed on your Mac, you can create a virtual machine with a Windows operating system and then use the ISO file within the virtual machine to create a bootable USB drive.
3. Seek professional assistance:
If you are not confident in your technical abilities or unable to find a suitable solution, it is recommended to seek professional assistance from a computer technician or a Mac repair service. They will be able to guide you through the process or perform the task on your behalf.
Bonus Tips
Here are a few bonus tips to make the process of burning Windows ISO to USB on a Mac even easier:
1. Check the integrity of the ISO file before burning it to the USB drive. Use checksum tools or online services to verify the file’s integrity.
2. Make sure you have enough free space on the USB drive before starting the burning process. Windows ISO files can be quite large, and insufficient space may cause issues.
3. Be cautious when selecting the USB drive in any software or command line tools. Selecting the wrong drive can result in data loss or unintentional erasing of important files.
5 FAQs about Burning Windows ISO File to USB on Mac
Q1: Can I use Disk Utility to burn ISO files to USB on a Mac?
A: Unfortunately, Disk Utility does not have a built-in feature to burn ISO files to USB on a Mac. You will need to rely on third-party software or Terminal commands.
Q2: Can I use macOS’ Boot Camp to create a bootable Windows USB on a Mac?
A: Boot Camp can be used to create a bootable Windows USB, but it is designed for installing Windows on a separate partition, not for burning ISO files to USB. It is recommended to use other methods mentioned in this article for creating bootable USB drives.
Q3: How long does it take to burn a Windows ISO to USB on a Mac?
A: The time it takes to burn a Windows ISO to USB on a Mac depends on various factors, such as the size of the ISO file and the speed of your USB drive. It can take anywhere from a few minutes to an hour or more.
Q4: Can I use the same USB drive for other purposes after burning a Windows ISO to it?
A: Yes, you can use the USB drive for other purposes after burning a Windows ISO to it. However, make sure to back up any important data on the USB drive before starting the burning process, as it will be erased.
Q5: Can I burn non-Windows ISO files to USB using the methods mentioned in this article?
A: Yes, the methods mentioned in this article can be used to burn non-Windows ISO files to USB on a Mac, as long as the ISO format is supported by the respective software or command line tools.
In Conclusion
Burning a Windows ISO to a USB on a Mac can be a challenge, but with the right tools and methods, you can create a bootable USB drive with ease. In this blog post, we explored several methods, including using Terminal, third-party software like SYSGeeker WonderISO and UNetbootin, and even using virtual machines or alternative solutions such as Boot Camp. By following the detailed steps provided and considering the bonus tips, you will be able to successfully burn a Windows ISO to a USB on your Mac.