Table of Contents
As usual, Apple unveiled a new macOS version called Sonoma at this year’s Worldwide Developers Conference. It is the latest macOS release and the short name is macOS 14, the successor of macOS 13 Ventura. If your Mac has been upgraded to Sonoma and you are looking for a way to create a Windows 11 install USB on Mac Sonoma, then it is highly recommended to take a look at this comprehensive tutorial that offers 4 different ways to complete this task.
Notice: All the methods suggested in this post are working perfectly on both Intel and Apple M1/M2 Mac.
Limitations for Creating Windows 11 Install USB on Mac
Making a Windows 11 installation USB on Windows PC is a very simple task as you have tons of free tools to get the job done. Even Microsoft developed an official app called Media Creation Tool to help you work out the steps. However, the situation is much different and more challenging on a modern Mac, especially Apple Silicon Mac.
Apple has removed Bootcamp App from all Macs with Apple Silicon Mac. This means you don’t have official support anymore. In the past, Bootcamp is the built-in system application to install Windows on Mac and create a separate Windows install USB for later use.

In addition, creating Windows bootable USB feature is also deleted from Bootcamp app on Intel Mac since macOS Big Sur. This indications there is no official way to make a Windows 11 install USB on Mac Sonoma. Fortunately, we have a few other workaround to overcome this challenge.
What is a Windows 11 Install USB Used for?
A Windows 11 install USB, also known as a bootable USB, is used for installing the Windows 11 operating system on a computer. This can be necessary in a variety of situations:
Fresh Install: If you’re building a new PC from scratch or if you’ve replaced the hard drive on your computer, you’ll need an operating system to get it up and running. A Windows 11 install USB can be used to install Windows 11 on the new machine or hard drive.
Upgrade from an older version: If your current Windows version is outdated, you might want to upgrade to the latest version. A Windows 11 install USB can be used to upgrade from an older version to Windows 11.
Clean Install: If your computer is experiencing serious problems, sometimes the best solution is to start over with a clean slate. You can use a Windows 11 install USB to completely wipe your computer’s hard drive and install a fresh copy of Windows 11.
Recovery: If your system crashes or the hard drive becomes corrupted and you’re unable to restore your computer through the normal recovery methods, a Windows install USB can be used to restore the system to a working state.
These are some of the most common uses of a Windows 11 install USB. However, creating a bootable USB requires a certain level of computer knowledge and should be done with care, as it can potentially result in data loss if not handled properly. Always ensure you have a backup of your data before proceeding with an OS installation or upgrade.
Method 1: Use a Windows Virtual Machine if It exists
A Windows virtual machine is a way of running the Windows operating system within the macOS operating system. This is done using virtualization software, which creates a virtual environment with its own virtual hardware, separate from your computer’s actual hardware. You can install and run all Windows tools on Mac under this virtual environment.
To create a bootable USB for Windows within a Windows virtual machine on Mac, you would need to install a virtualization tool like Parallels Desktop or VMware Fusion, install Windows on the virtual machine, and then use the virtual Windows machine to create your bootable USB.
This is the best way to create a Windows 11 installation USB on Mac if you already have a Windows virtual machine on your Mac. Otherwise, it is more recommended to use third-party bootable USB creation tool on Mac as setting up a Windows VM on Mac is quite complicated. In addition, you need to have more than 50 GB free space on your Mac and pay for a commercial license for virtual machine software.
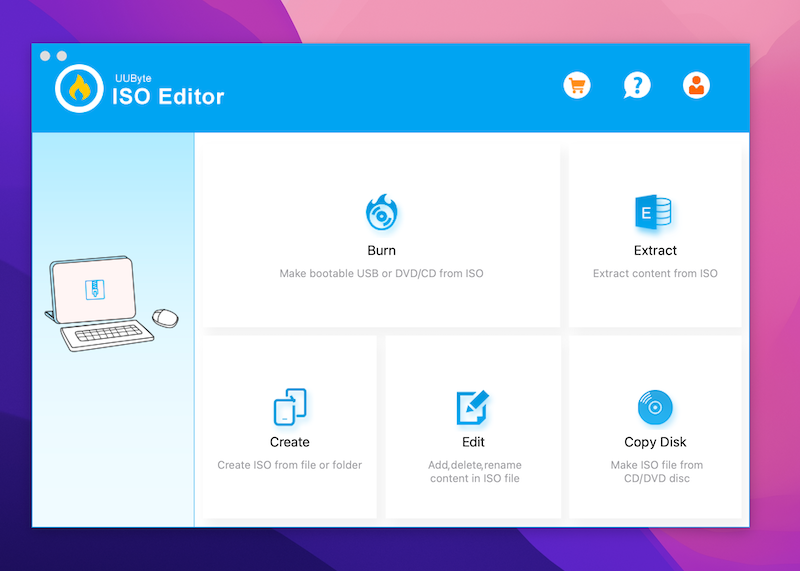
Method 2: Create Windows 11 Install USB on Mac Sonoma with ISO Editor
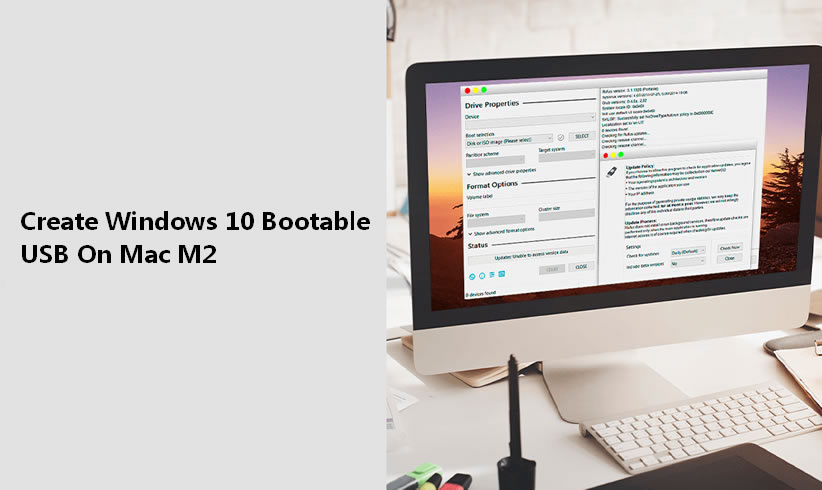
UUByte ISO Editor is a powerful ISO toolkit that allows you to create, burn, extract, edit, and copy disk images. It’s easy to use, with an intuitive interface that makes it straightforward to perform all kinds of operations on ISO files. The latest version adds support for macOS Sonoma and Apple M2 chip.
Below are the detailed steps on how to use UUByte ISO Editor to create a Windows 11 install USB on Mac Sonoma:
Step 1: Download the application from the UUByte official website and install it on your Mac.


Step 2: Go to this page and download Windows 11 ISO on your Mac.
Step 3: Plug in your USB drive into your Mac. Be aware that all data on the USB will be erased during the process, so make sure to back up any important files beforehand.
Step 4: Launch the UUByte ISO Editor on your Mac. On the home interface, click on the ‘Burn’ module, which allows you to create a bootable disk.
Step 5: In the Burn module, click the ‘Browse’ button to locate and select the Windows 11 ISO file you downloaded. Then, select your USB drive in the ‘Destination’ section.
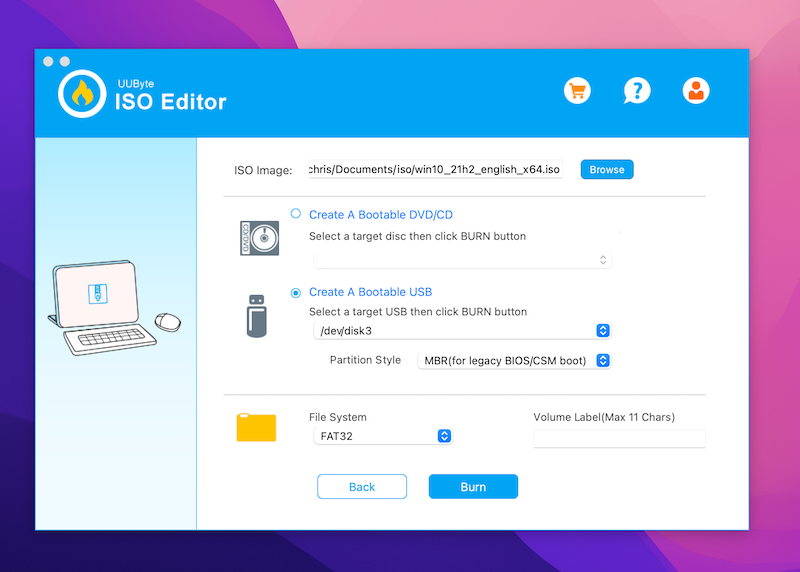
Step 6: After confirming the ISO file and the destination drive, click the ‘Burn’ button to start the process. The software will format the USB drive, extract the ISO file, and create the bootable USB.
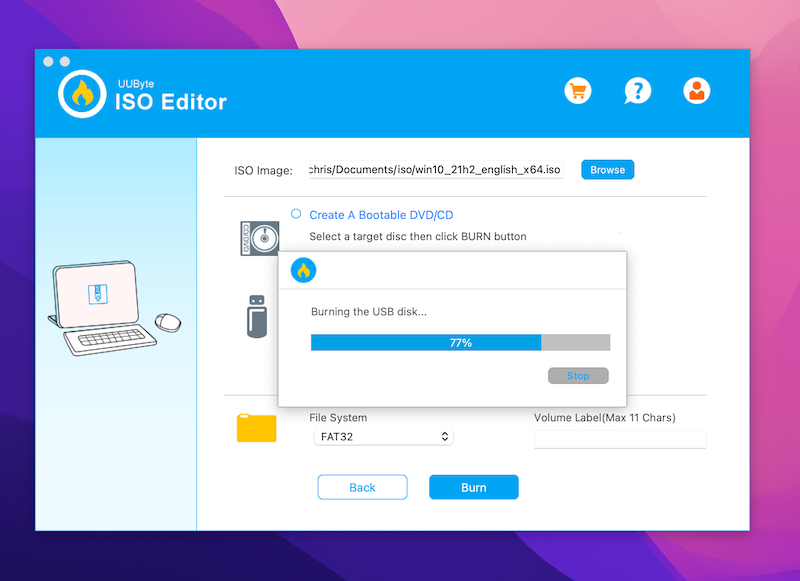
Step 7: This may take a while, depending on the speed of your USB drive. Once the process is complete, UUByte ISO Editor will notify you that the bootable USB drive has been created successfully.
More reading: How to Create Windows 10 Installation Media on Mac Sonoma
Method 3: Create Windows 11 Install USB on Mac Sonoma with UNetbootin
UNetbootin (Universal Netboot Installer) is a free, open-source bootable USB creation tool that allows you to create bootable USB drives for a variety of operating systems, including various distributions of Linux and Windows.
While you might be able to find guides online detailing how to use UNetbootin to create a Windows 10 or Windows 11 bootable USB, it’s generally recommended to use a tool that officially supports the creation of Windows bootable drives to ensure compatibility and reduce the risk of issues. Tools like UUByte ISO Editor (on Mac) would typically be recommended for this purpose.
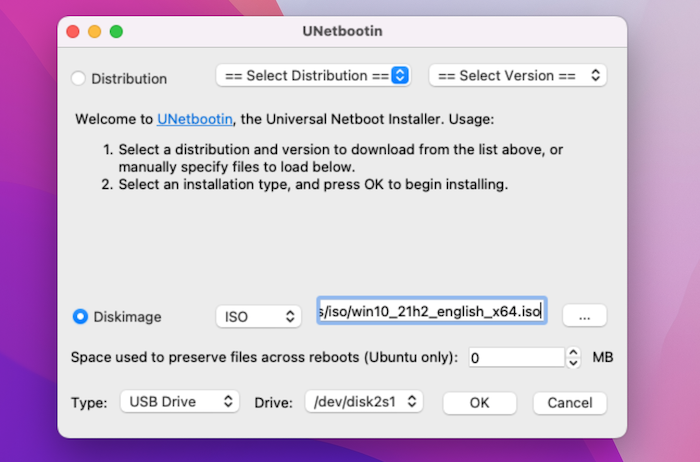
If you still wish to use UNetbootin, here’s a basic guide on how to use it to create a Linux bootable USB on Mac, as this is a supported use case for UNetbootin:
Step 1: You can download UNetbootin from the official website and install it on your Mac.
Step 2: Download the ISO file for the Linux distribution you want to install.
Step 3: Launch the application, and select the ‘Diskimage’ option. Use the ‘…’ button to browse for and select the ISO file you downloaded.
Step 4: In the ‘Type’ section, make sure ‘USB Drive’ is selected. In the ‘Drive’ section, select your USB drive.
Step 5: Click the ‘OK’ button. UNetbootin will then copy the files to your USB drive and make it bootable.
Remember that creating a bootable USB will erase all data on the drive, so be sure to back up any important files before you proceed. Also, when creating a bootable USB for installing an operating system on a different computer, ensure that the target computer is compatible with the OS you’re installing.
Method 4: Create Windows 11 Bootable USB on Mac Sonoma with Etcher
Balena Etcher, often referred to as simply Etcher, is an open-source utility designed to create bootable USB drives or flash OS images onto SD cards. It’s popular due to its simple user interface and the fact it’s available on all major platforms: Windows, macOS, and Linux.
Here’s a basic guide on how to use Etcher to create a Windows 11 bootable USB on Mac:
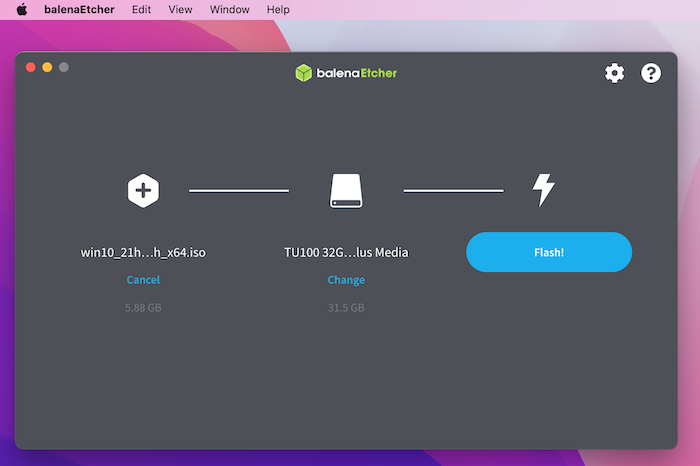
Step 1: You can download Etcher from the official website and install it on your Mac.
Step 2: Plug in your USB drive into your Mac. Remember that all the data on the USB drive will be erased during the process, so make sure to back up any important files beforehand.
Step 3: Launch the application. The user interface is straightforward and only involves three steps.
Step 4: Click on the "Flash from file" button and select the Windows 11 ISO file you downloaded. Then click on "Select target" and choose your USB drive from the list of available drives.
Step 5: After confirming the ISO file and the USB drive, click on the "Flash!" button. You might be asked for your administrator password since the application needs escalated privileges to perform the operation.
Step 6: Etcher will format the USB drive, write the ISO file onto the drive, and then verify the write process. Once completed, Etcher will notify you that the bootable USB drive is ready to use.
Bonus: Why Choosing Windows 11 Instead of Windows 10
Here are some reasons someone might choose Windows 11 over Windows 10:
New User Interface (UI): Windows 11 has a completely new, centered Start Menu and Taskbar design, which can make the system feel fresh and modern. The rounded corners and updated icons also give Windows 11 a more polished look.
Better performance: Windows 11 promises better performance with faster updates that are 40% smaller and happen in the background.
Support for Android Apps: One of the most significant features of Windows 11 is its ability to natively run Android apps, which could greatly increase the number of apps available to users.
New Widget System: Widgets, which offer personalized news, weather, calendar, and other features, make a return in Windows 11.
However, it’s important to note that Windows 11 comes with more stringent hardware requirements than Windows 10, and not all older computers will be able to upgrade. Always check the system requirements before attempting to upgrade your operating system.
Video Tutorial: How to Create Windows 11 Install USB on Mac
Frequently Asked Questions
Did Apple discontinue Boot Camp?
Yes. Boot Camp app is no longer available on all Apple Silicon Macs as Apple is planning to replace Intel chip with its own. Boot Camp is now Intel-Mac application in 2023!
Why did Apple get rid of Boot Camp?
With transition from Intel processors to its own custom silicon, starting with the M1 chip, Apple has not included Boot Camp support on these new machines. This decision isn't necessarily about Apple wanting to get rid of Boot Camp, but rather a byproduct of the architectural shift from Intel's x86 architecture to Apple Silicon's ARM architecture.
Is UUByte ISO Editor a legit app?
Yes. UUByte ISO Editor is a legitimate application that's used to handle ISO files. It allows users to create, edit, extract, and burn ISO files, making it useful for creating bootable USB drives, extracting content from ISO files, or creating ISO files from CDs, DVDs, or folders on your computer.
How to create a Windows 11 bootable USB on Mac M1?
Creating a Windows 11 bootable USB on an M1 Mac is somewhat different than on an Intel-based Mac because of the architecture differences. However, you can still create a Windows 11 bootable USB using third-party software such as UUByte ISO Editor or Balena Etcher.
How to virtualize Windows 11 on Mac M1?
With the introduction of M1 chip and the shift from Intel x86 architecture to ARM-based architecture, the way we run Windows on Mac has changed. Unlike with Intel-based Macs, the traditional method of dual-booting through Boot Camp is no longer supported on M1 Macs. However, that doesn't mean you can't run Windows on your M1 Mac. In fact, you can virtualize it using virtual machine software, such as UTM or Parallels Desktop.
Summary
Creating a Windows 11 installation USB on Mac Sonoma can be a bit challenging due to the differences in architecture between the ARM-based M1 chips and the x86-based systems that most versions of Windows are built for. However, it is still possible to create a bootable Windows 11 USB drive using third-party applications.
One of the best ways to create a Windows 11 install USB on a Mac M1 is by using UUByte ISO Editor, a powerful utility tool. It provides a straightforward, user-friendly interface to create Windows 11 bootable USB drives on modern Macs.
Despite being able to create a bootable USB drive, note that you cannot directly install Windows 11 on an M1 Mac from this USB due to the architectural differences mentioned earlier. If you wish to run Windows 11 on your M1 Mac, the recommended approach is to use virtualization software, such as Parallels Desktop, which can create a virtual environment for running the ARM version of Windows 11.
Thanks for sharing these methods to create a Windows 11 Install USB on a Mac! I’ve been trying to set up a dual boot on my MacBook and this guide has been a lifesaver. However, I ran into a small hiccup with Method 2. It seems my version of Boot Camp Assistant doesn’t support creating a Windows 11 bootable drive. Any suggestions or workarounds for this? On a side note, it’s impressive to see how software compatibility has evolved, bridging the gap between Mac and Windows ecosystems. Thanks again!