Creating a bootable USB drive is a handy skill to have, especially if you’re a Mac user who wants to install Windows 10 or 11 on their machine. While Bootcamp is the go-to method for this task, there are other ways to accomplish it without using Bootcamp. In this blog post, we’ll explore three alternative methods that you can use to create a bootable USB drive on your Mac without Bootcamp. These methods offer flexibility and convenience, allowing you to easily install Windows on your Mac machine for those moments when you need to switch operating systems.
What’s Bootcamp
Before we dive into the alternative methods, let’s briefly discuss what Bootcamp is and why you might want to explore other options. Bootcamp is a utility offered by Apple that allows you to install and dual-boot Windows on your Mac machine. It provides a streamlined and user-friendly approach for Mac users who want to enjoy the benefits of both macOS and Windows.
While Bootcamp is a popular and reliable solution, some users might prefer alternative methods for creating a bootable USB drive. This could be due to personal preferences, specific requirements, or simply wanting to explore different options.
Why I can’t Use Bootcamp
While Bootcamp is a convenient and reliable option for creating a Windows bootable USB on Mac, there may be situations where you can’t or don’t want to use Bootcamp. Here are a few reasons why you might consider alternative methods:
- Compatibility issues: In some cases, your Mac model may not support Bootcamp, or you may encounter compatibility issues that prevent you from using it.
- Limited disk space: Bootcamp requires a significant amount of disk space to create a dedicated partition for Windows. If you have limited disk space, you may prefer alternative methods that don’t require partitioning.
- Preference for third-party solutions: Some users prefer to use third-party software to create a Windows bootable USB on Mac. These software options may offer additional features or customization options.
Now that we understand the limitations of Bootcamp, let’s explore three different methods to create a Windows 10/11 bootable USB on Mac without Bootcamp.
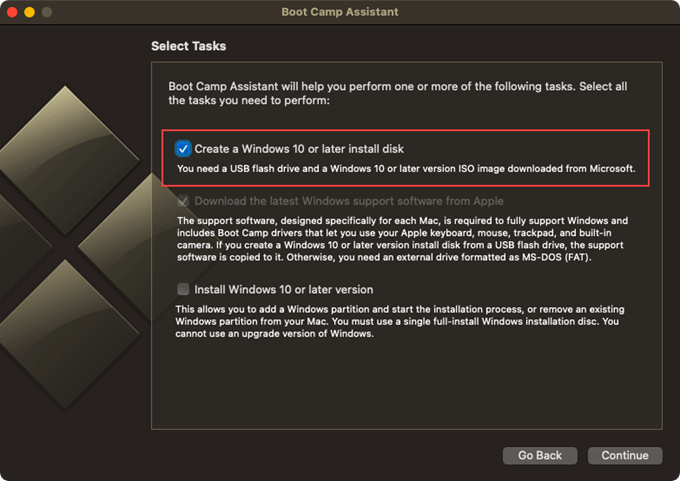
Part 1. Ceate Windows 10/11 Bootable USB on Mac with Bootcamp
Before diving in, it’s worth considering the Mac’s Boot Camp Assistant. While it offers the functionality to craft bootable Windows 10 USB drives for select Mac models, some users have encountered challenges, particularly during the formatting or file transfer phases. Nonetheless, giving it a try might be beneficial.
- Prepare Your USB Drive: Insert the flash drive into a free USB port on your Mac. Do a quick check to ensure there’s nothing important on it as we’ll be wiping it clean.
- Fire Up Boot Camp Assistant: Navigate to your
Applicationsfolder, then intoUtilities, and you’ll findBoot Camp Assistantready to serve. - Get the Windows Support Software: On the top menu bar in Boot Camp Assistant, hit "Action" and then “Download Windows Support Software”. This software ensures that Windows plays nicely with your Mac’s hardware.
- Choose the Right Settings: Back on the main screen, opt for "Create a Windows 7 or later version install disk" and ensure "Install Windows 7 or later version" is unchecked.
- Point to the Windows ISO: Click "Choose" next to the ISO image box. Find and select your downloaded Windows 10 ISO file.
- Destination Time: Boot Camp Assistant will auto-detect your USB. Confirm your USB flash drive as the destination.
- Let the Magic Happen: Click "Continue" and Boot Camp Assistant will create the bootable Windows 10 USB drive. It formats the drive and transfers necessary files, so grab a coffee as it may take some time.
- Booting from the USB: To use the drive, restart your Mac while pressing the
Option (⌥)key. When you see the boot menu, choose the USB drive, and you’re on your way to installing Windows!
Part 2. Ceate Windows 10/11 Bootable USB on Mac without Bootcamp
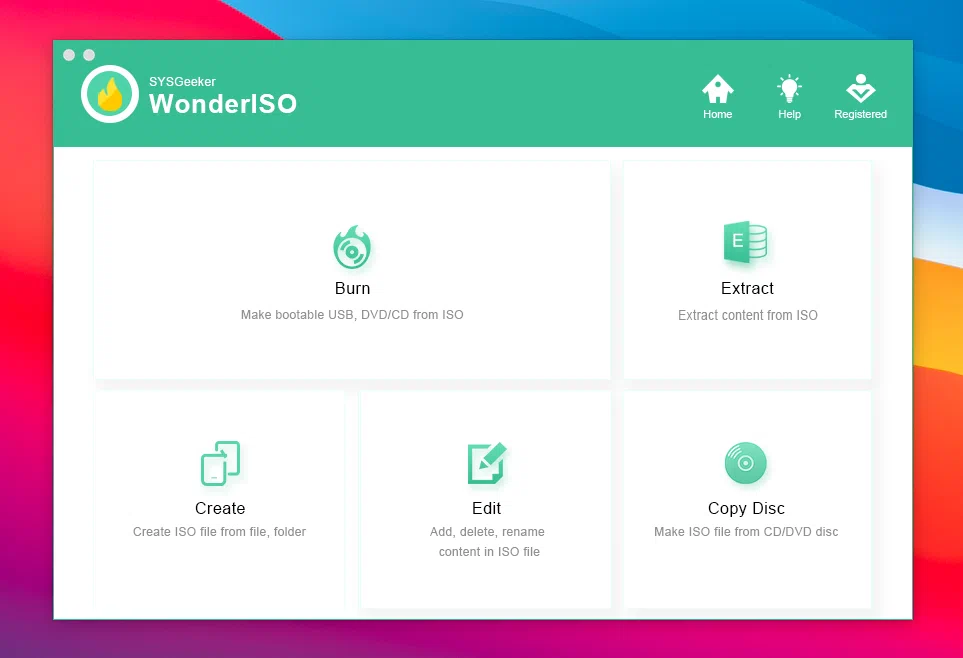
Method 1: Using WonderISO
The second method we’ll explore is using WonderISO, a third-party application available for macOS. WonderISO provides a simple and user-friendly interface for creating bootable USB drives. Its name stands for "Reliable USB Formatting Utility," and it’s especially popular for creating bootable USB drives from ISO files. Here are its core functions:
- Bootable USB Creation: WonderISO can take an ISO file and create a bootable USB flash drive from it. This is useful for installing operating systems, running live Linux distributions, or booting into utilities.
- Support for Various Boot Types: WonderISO supports both BIOS and UEFI booting, which means it can be used on a variety of machines, both old and new.
- File System Support: WonderISO supports formatting drives as FAT, FAT32, NTFS, UDF, and even exFAT, allowing for compatibility with many different systems and situations.
- Speed: In many cases, WonderISO is faster than other comparable utilities at creating bootable USB drives.


2. Launch WonderISO. Insert the USB drive into your Mac.
3. In WonderISO, click on the "Select ISO" button and choose the Windows ISO file you want to use. Then select the USB drive from the "Select Device" dropdown menu.
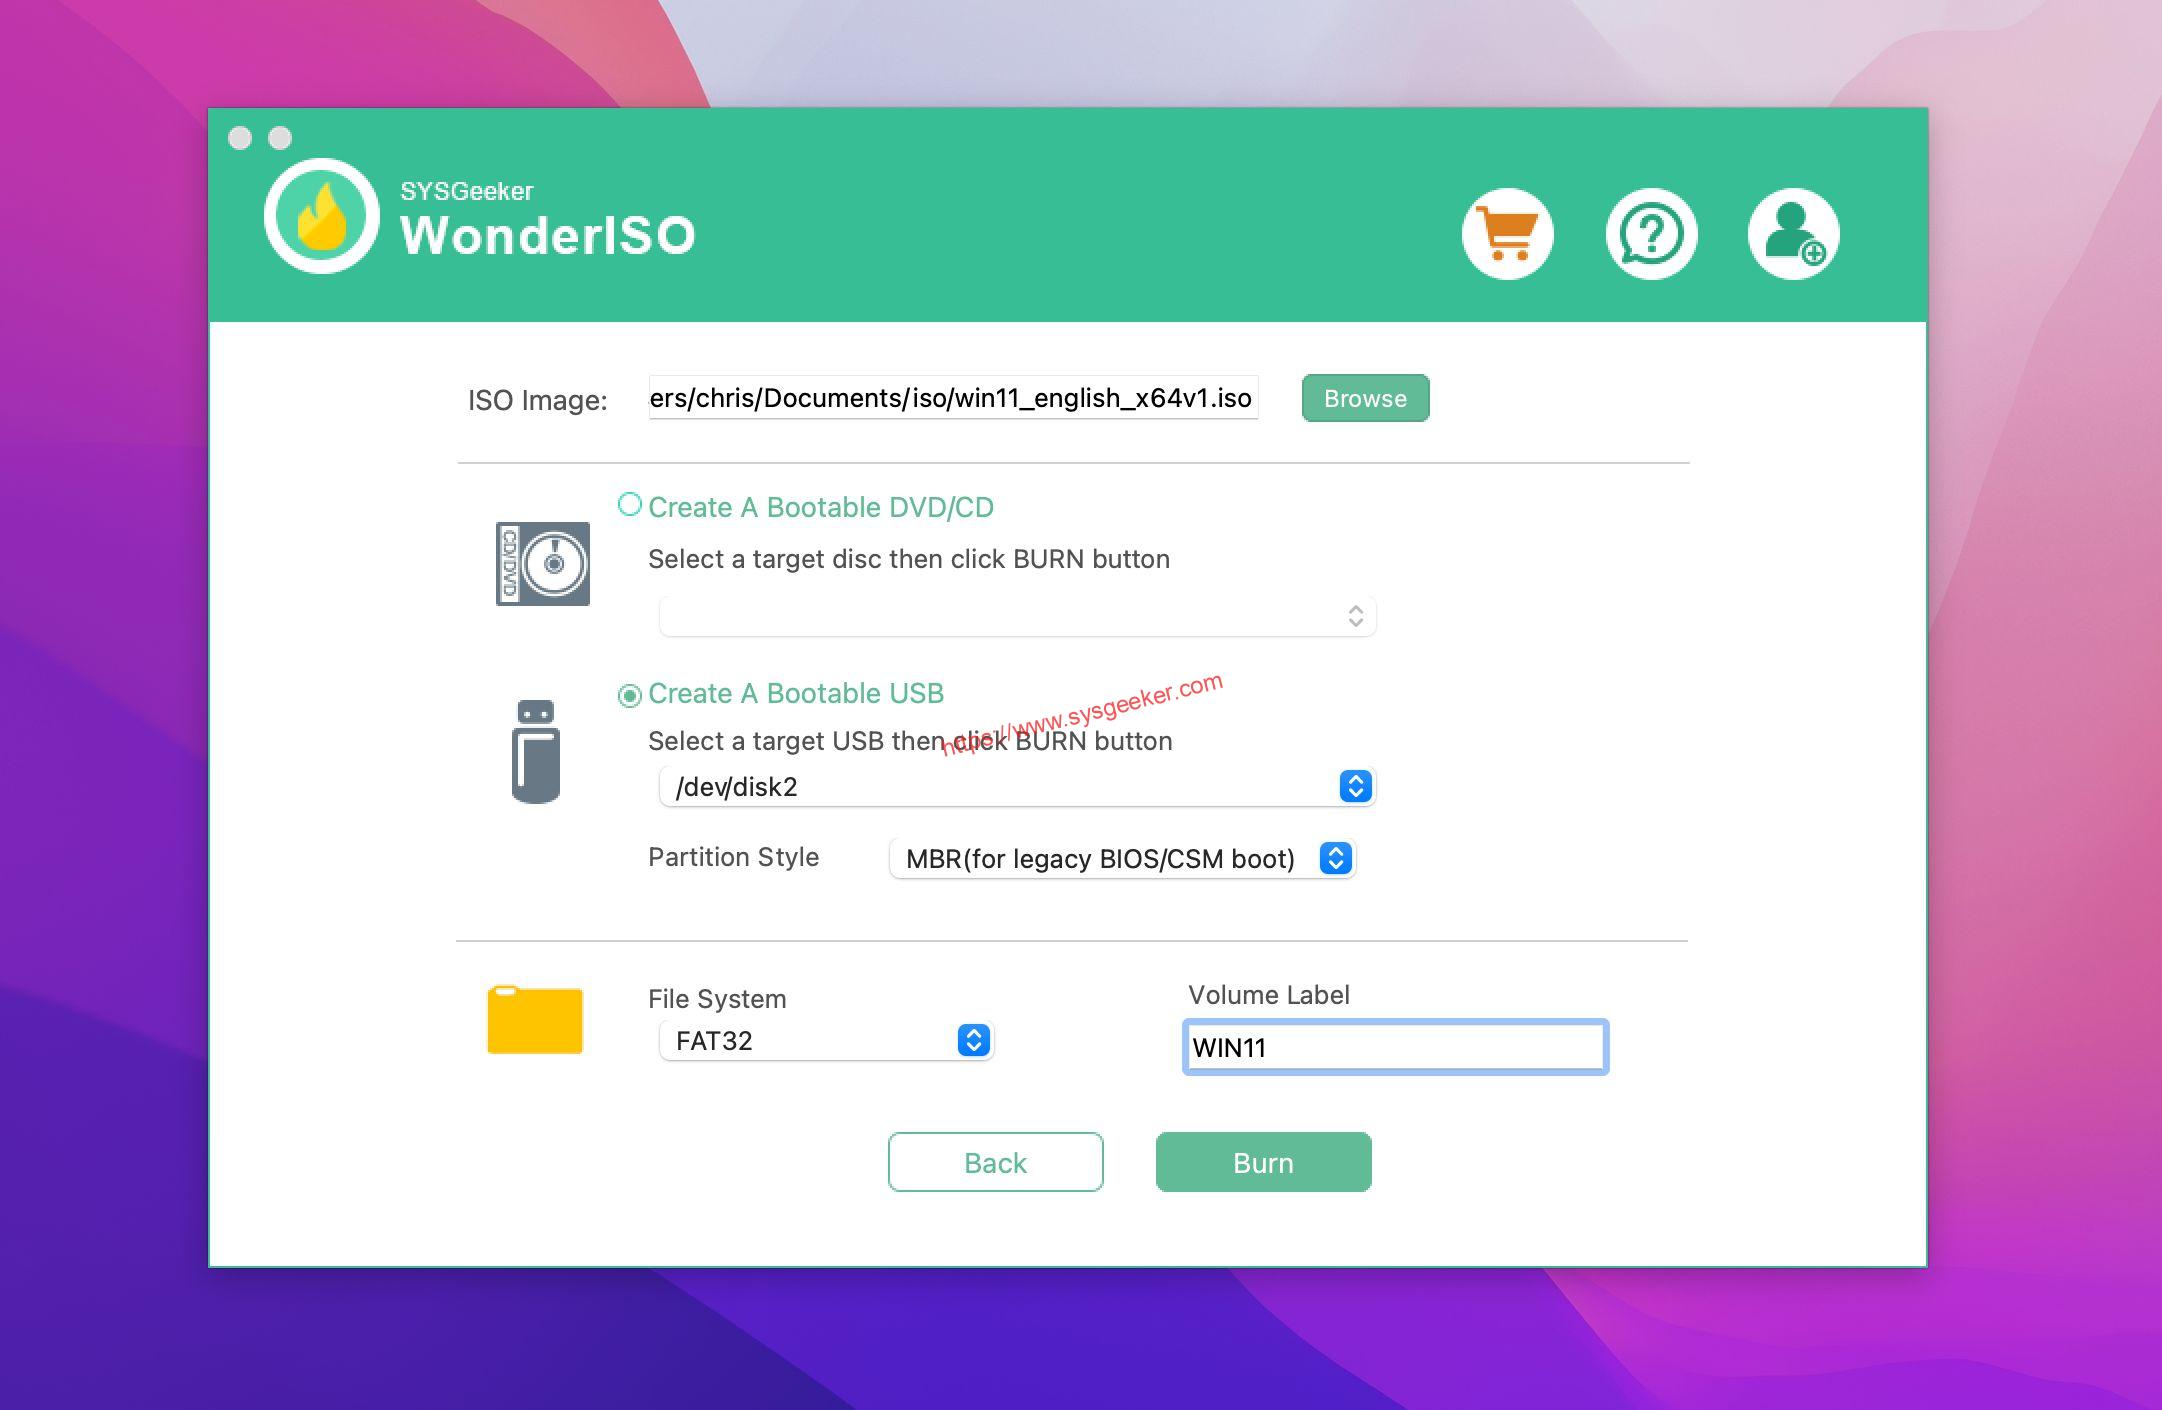
4. Click on the "BURN" button to start the process.
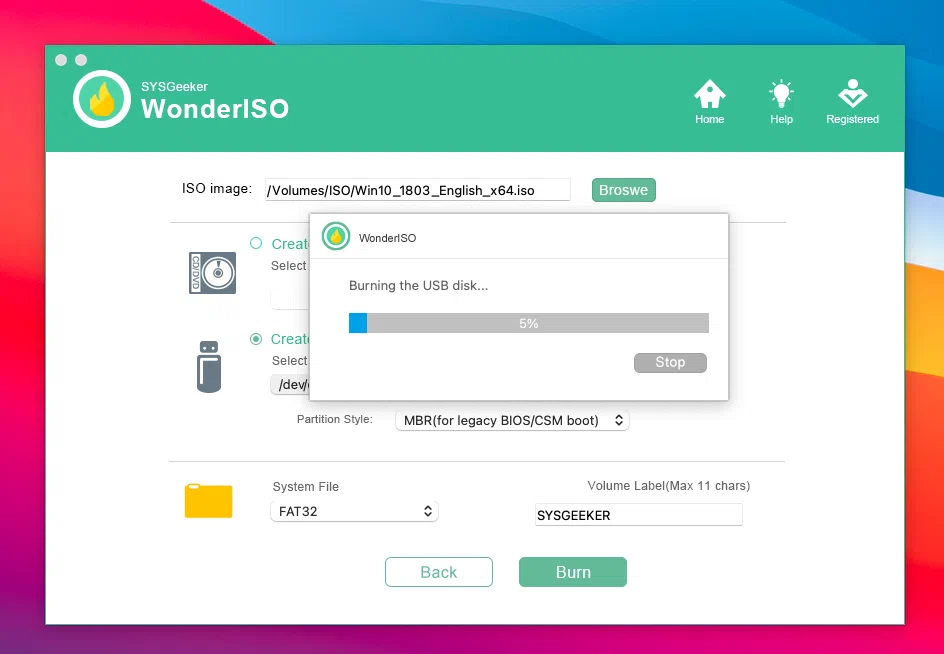
5. Wait for the process to complete, then eject the USB drive.
Pros:
1. User-friendly interface, suitable for beginners.
2. Simplifies the process of creating a bootable USB drive.
3. Supports various Windows ISO files.
Cons:
1. Requires the installation of a third-party application.
2. Limited customization options compared to the Terminal method.
Method 2: Using Terminal
The first method we’ll explore is using Terminal, the command-line interface for macOS. This method offers complete control and customization options for creating a bootable USB drive. Here are the steps:
1. Insert the USB drive into your Mac.
2. Launch Terminal. You can find it in the Utilities folder within the Applications folder.
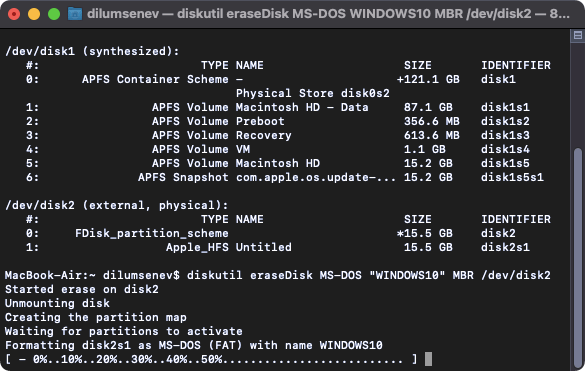
3. Enter the following command to get a list of connected storage devices: `diskutil list`

4. Identify the identifier of your USB drive from the list. It will typically be something like `/dev/diskX` (replace X with the appropriate number).
5. Use the following command to erase and format your USB drive: `diskutil eraseDisk MS-DOS "WINDOWS10" MBR /dev/diskX` (replace X with the appropriate number and "WINDOWS10" with your desired name).
6. Download the Windows ISO file from the official Microsoft website.
7. Mount the ISO file by double-clicking on it.
8. In Terminal, navigate to the mounted ISO file using the `cd` command.
9. Run the following command to copy the contents of the ISO file to the USB drive: `cp -rp * /Volumes/WINDOWS10` (replace "WINDOWS10" with the name you specified in step 5).
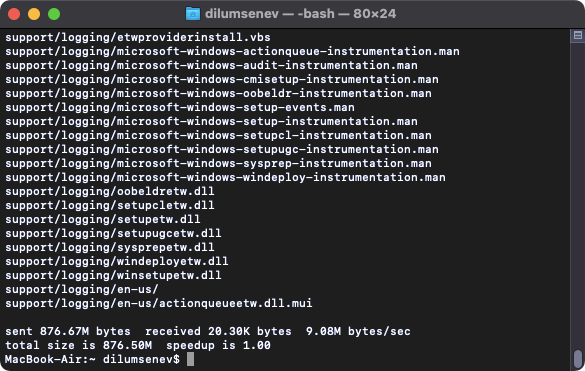
10. Wait for the files to be copied, then eject the USB drive.
Pros:
1. Offers complete control and customization options.
2. Can be done entirely through the command line, making it suitable for advanced users.
3. Supports a wide range of Windows ISO files.
Cons:
1. Requires familiarity with Terminal and command-line interface.
2. Can be more complex and time-consuming compared to other methods.
3. May not be suitable for beginners or users who prefer a graphical user interface.
Method 3: Using UNetbootin
The third method we’ll explore is using UNetbootin, another third-party application available for both macOS and Windows. UNetbootin allows you to create bootable USB drives for various operating systems, including Windows. Here are the steps:
1. Download and install UNetbootin from the official website.
2. Launch UNetbootin.
3. Insert the USB drive into your Mac.
4. In UNetbootin, select the DiskImage option.
5. Click on the "…" button and choose the Windows ISO file you want to use.
6. Select the USB drive from the "Drive" dropdown menu.
7. Click on the "OK" button to start the process.
8. Wait for the process to complete, then eject the USB drive.
Pros:
1. Provides a simple and intuitive interface.
2. Supports various operating systems, including Windows.
3. Can be used on both macOS and Windows machines.
Cons:
1. Requires the installation of a third-party application.
2. Limited customization options compared to the Terminal method.
3. Relies on the availability and reliability of UNetbootin.
Bonus Tip
Here are three bonus tips to enhance your experience when creating a bootable USB drive on your Mac:
1. Ensure you have a reliable and high-speed USB drive. Using a fast USB drive can significantly reduce the time it takes to copy the Windows ISO file and create the bootable USB drive.
2. Keep the Windows ISO file and the bootable USB drive in a safe place. These files can come in handy if you ever need to reinstall or repair Windows on your Mac.
3. Regularly update your macOS and third-party applications. Keeping your system and applications up to date ensures that you have the latest security patches and improvements, making the installation process smoother and more reliable.
How to Install Windows 10 from USB on Mac
Now that you have created a bootable USB drive using one of the methods mentioned above, you can proceed with the installation of Windows 10 on your Mac. The steps may vary slightly depending on the version of Windows you are installing and your specific Mac model. Here is a general guide to help you get started:
1. Insert the bootable USB drive into your Mac.
2. Restart your Mac and hold down the Option (⌥) key.
3. Select the USB drive from the Boot Manager screen.
4. Follow the on-screen instructions to install Windows 10 on your Mac.
5. Once the installation is complete, your Mac will reboot into Windows 10.
Remember to back up any important files before proceeding with the installation, as it may involve formatting and partitioning your Mac’s hard drive.
5 FAQs about Creating Windows 10 Bootable USB on Mac without Bootcamp
Q1: Can I create a bootable USB drive for Windows 11 using these methods?
A1: Yes, these methods can also be used to create a bootable USB drive for Windows 11. Simply download the Windows 11 ISO file from the official Microsoft website and follow the provided steps in each method.
Q2: Do I need a Windows license to install Windows on my Mac?
A2: Yes, you will need a valid Windows license to activate and use Windows on your Mac. The methods mentioned in this blog post focus on creating a bootable USB drive and do not provide a Windows license.
Q3: Are these methods compatible with all Mac models?
A3: Yes, these methods are generally compatible with most Mac models. However, specific hardware limitations or firmware restrictions may apply. It is always recommended to check the official documentation or support resources for your Mac model to ensure compatibility.
Q4: Can I uninstall Windows from my Mac after installing it with these methods?
A4: Yes, you can uninstall Windows from your Mac by using the Bootcamp utility or other methods provided by Apple. Keep in mind that uninstalling Windows will remove all the data and partitions associated with it, so make sure to back up any important files before proceeding with the uninstallation.
Q5: Can I use these methods to create bootable USB drives for other operating systems?
A5: Yes, these methods can be used to create bootable USB drives for various operating systems, including Linux distributions and other Windows versions. Simply download the ISO file for the desired operating system and follow the provided steps in each method.
In Conclusion
Creating a Windows 10/11 bootable USB drive on Mac without Bootcamp provides flexibility and alternative options for installing Windows. Whether you prefer the more advanced Terminal method, the user-friendly WonderISO, or the versatile UNetbootin, these methods allow you to create a bootable USB drive with ease. Don’t forget to follow the bonus tips and ensure you have a reliable USB drive for the best experience. With the ability to install Windows 10 or 11 on your Mac, you can enjoy the benefits of both macOS and Windows whenever you need them.