Table of Contents
As technology advances, computer users have a variety of options to choose from when it comes to operating systems. For Apple users, the introduction of the M2 chip has brought enhanced performance and efficiency. However, this innovation does not come without its challenges, particularly when it comes to creating a bootable USB for Windows 11 on a Mac with the M2 chip. In this blog post, we will discuss different methods to create a Windows 11 bootable USB on Mac M2, including using the UUByte ISO Editor, Terminal, and creating a Windows 10 virtual machine.
Introduction to Apple M2 Chip
The Apple M2 chip is the successor to the groundbreaking M1 chip, representing the next generation of Apple Silicon. This advanced ARM-based processor is designed specifically for Mac computers, offering improved performance, energy efficiency, and tight integration with macOS. The M2 chip has significantly enhanced the capabilities of Mac devices, delivering a more seamless and powerful computing experience.
While the M2 chip has brought significant improvements to Mac devices, there are some downsides or "download sides" associated with this chip:
Compatibility issues: Some Windows applications may not be compatible with the M2 chip due to its ARM architecture, limiting the range of available software for users who rely on cross-platform applications.
Boot Camp limitations: The M2 chip is not supported by Boot Camp, Apple’s built-in solution for running Windows on Intel-based Macs. This makes it more challenging to create a bootable Windows USB or run Windows natively on M2 Macs.
Limited hardware upgrades: The M2 chip’s integrated design, which combines CPU, GPU, and RAM onto a single chip, means that hardware upgrades are more limited than with traditional, modular components.
Can You Use BootCamp to Make a Windows 11 Bootable on M2 Mac?
Unfortunately, Bootcamp, Apple’s built-in solution for creating Windows bootable USB on Intel-based Macs, does not support the M2 chip. This is due to the ARM architecture of the M2 chip, which is incompatible with the x86 architecture that Boot Camp relies on. Therefore, you will need to explore alternative methods to create a Windows 11 bootable USB on your Mac M2.
UUByte ISO Editor – The Best App for Creating Windows 11 Bootable USB on M2 Mac
UUByte ISO Editor for Mac is a versatile and user-friendly software that provides an all-in-one solution for managing ISO files on macOS. This powerful tool simplifies tasks such as creating, editing, extracting, and burning ISO files, making it an essential application for users who frequently work with ISO images. With its intuitive interface and wide range of features, UUByte ISO Editor for Mac caters to users of all skill levels, from beginners to experts.
Key Features of UUByte ISO Editor for Mac
- Create bootable USB drives: Easily create bootable USB drives for various operating systems, including Windows, Linux, and macOS.
- Burn ISO files to CD/DVD: Quickly and efficiently burn ISO images to CDs or DVDs with just a few clicks.
- Extract files from ISO images: Access and extract files from ISO images without the need for additional software.
- Edit ISO files: Add, delete, or rename files within an ISO image to customize its contents.
Creating a Windows 11 bootable USB on an M2 Mac with UUByte ISO Editor is a straightforward process. Follow these steps to create a bootable USB drive on Mac for Windows 11:


Step 1. Visit Microsoft’s website and download the official Windows 11 ISO file to your Mac.
Step 2. Open UUByte ISO Editor website, download the Mac version, and install it on your Mac M2.
Step 3. Plug in a USB drive with a minimum capacity of 8GB into your Mac. Make sure to back up any important data on the drive, as it will be formatted during the process.
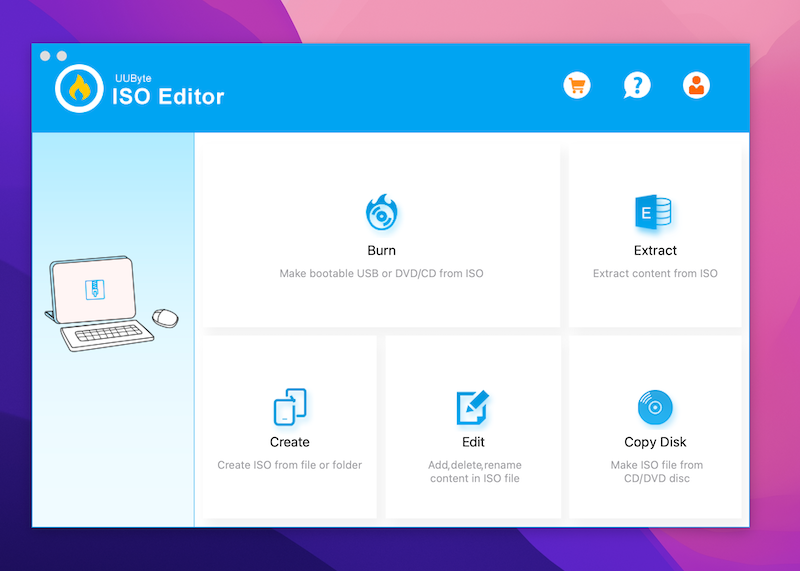
Step 4. Open the UUByte ISO Editor application on your Mac.
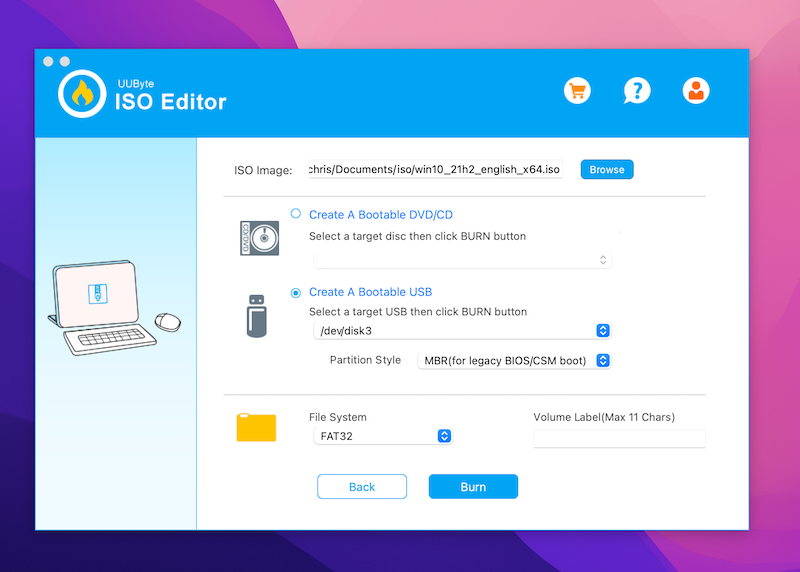
Step 5. In the main interface, select the "Create" option. Click "Browse" to locate the downloaded Windows 11 ISO file on your Mac. Choose the USB drive from the "Destination USB" dropdown menu. Click "Create" to start the process of creating a Windows 11 bootable USB drive.
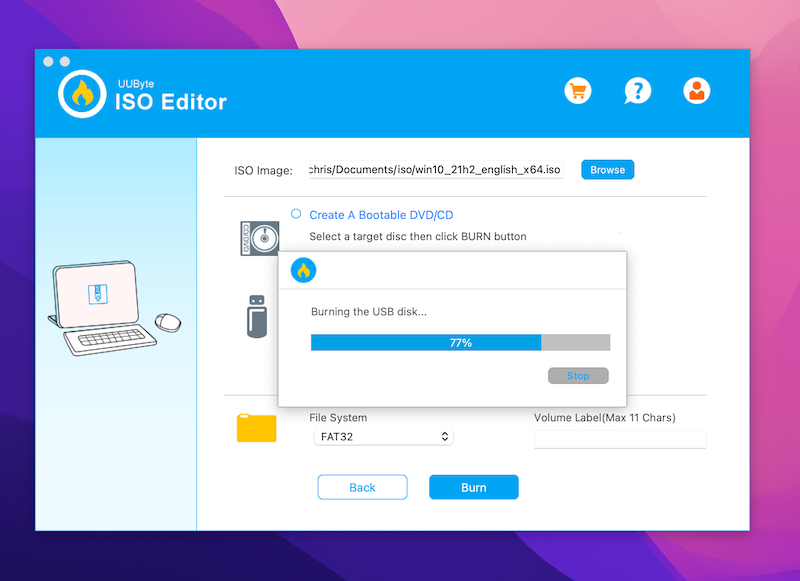
Step 6. The creation process may take some time, depending on the speed of your USB drive and Mac. Once the process is finished, you will see a message indicating that the bootable USB has been successfully created.
NOTE: Make sure to eject the USB drive from your Mac before unplugging it to avoid data corruption.
You have now successfully created a Windows 11 bootable USB on your Mac M2 using UUByte ISO Editor. You can use this USB drive to install or run Windows 11 on a compatible PC or Mac with virtualization software. Once the process is complete, you will have a Windows 11 bootable USB ready for use on your Mac M2.
Video Tutorial: How to Create a Windows 11 Bootable USB on Mac without Bootcamp
Terminal: An Advance Approach to Create Windows 11 Bootable USB on M2 Mac
For those who prefer a command-line interface, you can create a Windows 11 bootable USB on Mac M2 using Terminal. Follow these steps:
- Download the Windows 11 ISO file from Microsoft’s website.
- Insert a USB drive (at least 8GB) into your Mac and format it as FAT32 or exFAT.
- Open Terminal and navigate to the folder containing the Windows 11 ISO file.
- Run the following command to create a bootable USB drive:
sudo dd if=/path/to/windows11.iso of=/dev/diskX bs=1m
Replace /path/to/windows11.iso with the actual path of the Windows 11 ISO file and /dev/diskX with the identifier of your USB drive (e.g., /dev/disk2). You can find the identifier by running the diskutil list command in Terminal.
- Once the process is complete, your Windows 11 bootable USB is ready for use on your Mac M2.
- Create Windows 10 virtual machine to make Windows 11 bootable on M2 Mac
There are several cons associated with using the Terminal app to create a Windows 11 bootable USB on an M2 Mac. Here are the main drawbacks:
Command-line interface: Terminal relies on a command-line interface, which may be intimidating or confusing for users who are not familiar with this type of interaction. Users who prefer a more user-friendly, graphical interface may find Terminal challenging to navigate and use.
Risk of data loss: Using Terminal commands requires careful attention to detail, as a single mistake in a command can potentially lead to data loss or other issues. It is crucial to double-check your commands and ensure you are targeting the correct disk or file before executing them.
Limited error reporting: If something goes wrong during the process of creating a Windows 11 bootable USB using Terminal, the error reporting may be minimal or unclear. This can make it difficult to troubleshoot and resolve any issues that arise.
Longer processing time: Using the Terminal method can be more time-consuming than using dedicated ISO editing software, as it requires manually entering commands and waiting for each step to complete.
No advanced features: Terminal does not offer advanced features or options for customizing the bootable USB, unlike some dedicated ISO editing software. This may limit the functionality of the resulting bootable USB.
Despite these cons, the Terminal app remains a viable option for creating a Windows 11 bootable USB on an M2 Mac, especially for users who are comfortable with command-line interfaces and can carefully follow instructions. However, for those who prefer a more user-friendly experience, dedicated ISO editing software like UUByte ISO Editor might be a better choice.
Windows 10 Virtual Machine: The Alternative Way to Make Windows 11 Bootable on M2 Mac
Another method to create a Windows 11 bootable USB on Mac M2 is by using a Windows virtual machine. You can create a Windows 10 virtual machine using software like Parallels Desktop or VMware Fusion. After setting up Windows 10 on your Mac M2, follow these steps:
- Download the Windows 11 ISO file from Microsoft’s website.
- Insert a USB drive (at least 8GB) into your Mac and format it as FAT32 or exFAT.
- Launch your virtual machine and connect the USB drive to the virtual Windows 10 environment.
- Use a tool like Rufus or the built-in Windows 10 Media Creation Tool to create a Windows 11 bootable USB.
However, there are some downsides to using a virtual machine to create a Windows 11 bootable USB on an M2 Mac. Here are the main cons:
Performance limitations: Running a virtual machine can consume a significant amount of system resources, including CPU, RAM, and storage space. This can result in slower performance for both your host macOS system and the virtual Windows environment.
Complexity: Setting up and configuring a virtual machine can be more complex than using dedicated ISO editing software or the Terminal method. Users who are unfamiliar with virtualization software may find the process confusing and challenging.
Licensing: To create a Windows 11 bootable USB using a virtual machine, you need a valid Windows 10 or Windows 11 license. This can be an additional cost for users who do not already have a license.
Software compatibility: Not all virtualization software is fully compatible with the M2 Mac and Windows 11. This may result in limited functionality, reduced performance, or other issues when running Windows 11 in a virtual machine.
Time-consuming: Creating a Windows 11 bootable USB using a virtual machine generally takes longer compared to using dedicated ISO editing software or the Terminal method, as you need to set up the virtual environment, install the necessary tools, and then create the bootable USB.
Despite these drawbacks, using a virtual machine to create a Windows 11 bootable USB on an M2 Mac can still be a viable option for users who are familiar with virtualization software and have the necessary system resources to accommodate the performance requirements.
Frequently Asked Questions
Q: Can I use Boot Camp to create a Windows 11 bootable USB on my Mac M2?
A: No, Boot Camp does not support Macs with the M2 chip. You will need to use alternative methods like UUByte ISO Editor, Terminal, or a virtual machine.
Q: How large should my USB drive be to create a Windows 11 bootable USB?
A: Your USB drive should have a minimum capacity of 8GB.
Q: Can I install Windows 11 directly on my Mac M2?
A: No, the ARM-based M2 chip is not currently compatible with Windows 11. You can, however, use a virtual machine to run Windows 11 on your Mac M2.
Q: Is the Terminal method to create a Windows 11 bootable USB on Mac M2 suitable for beginners?
A: The Terminal method may be more challenging for users who are not comfortable with command-line interfaces. If you prefer a more user-friendly method, consider using UUByte ISO Editor or a virtual machine.
Q: Can I use other virtualization software besides Parallels Desktop or VMware Fusion to create a Windows 11 bootable USB on Mac M2?
A: Yes, you can use other virtualization software like VirtualBox. However, the process and performance may vary depending on the software you choose.
Conclusion
Creating a Windows 11 bootable USB on Mac M2 can be challenging due to the lack of native support and Boot Camp compatibility. However, alternative methods like UUByte ISO Editor, Terminal, and virtual machines provide viable solutions. By following the steps outlined in this blog post, you can successfully create a Windows 11 bootable USB on your Mac M2 and enjoy the benefits of both operating systems.