Table of Contents
macOS Sonoma, also known as macOS 14, is the successor to macOS Ventura and was announced at the WWDC 2023 conference. Its name continues Apple’s California-based naming convention and is named after Ventura Bay. If your Mac was upgraded to macOS Sonoma and decided to create a Windows 10 installation media on it, then you should take a full read of this post to get the job done!
New Features of macOS Sonoma
As a major release of macOS, the following features are highlighted in macOS Sonoma:
Universal Control: This feature allows users to work with a single mouse and keyboard and move between Mac and iPad for a seamless experience, with no setup required. Users can even drag and drop content back and forth between devices.
SharedPlay: This feature allows users to watch movies, listen to music, or share their screen with others over FaceTime.
Focus mode: Similar to the Do Not Disturb mode, but with more customization options, Focus mode allows users to set different notification preferences depending on their current activity (like working or personal time).
Live Text: This feature recognizes text in photos and allows users to interact with it (for example, to copy and paste an address from a picture).
Shortcuts: The Shortcuts app, previously available on iOS, is now on the Mac. It allows users to automate tasks and create custom shortcuts for everyday tasks.
macOS Sonoma Supported Mac Models
Not all Macs are eligible to run macOS Sonoma. According to the official documentation of Apple, the following Mac models were listed by Apple as being compatible with macOS Sonoma:
- MacBook Air: 2018 and later
- MacBook Pro: 2018 and later
- Mac Mini: 2018 and later
- iMac: 2019 and later
- Mac Pro: 2019 and later
- Mac Studio: 2022 and later
Can You Use Bootcamp on Mac Sonoma?
The quick answer is NO!
Bootcamp used to be the best app to make Windows 10 bootable USB on Mac. Unfortunately, Bootcamp was deprecated from all Apple Silicon Mac, including M1 and M2. What’s more, the bootable USB creation feature is removed from Intel Mac since macOS Big Sur. This means there is no way to create a Windows 10 installation media with Bootcamp app. We have to look around for other ways.
We will introduce three reliable ways to create Windows 10 bootable USB on Mac Sonoma without Bootcamp.
Best Way to Create Windows 10 Installation Media on Mac Sonoma
UUByte ISO Editor is indeed a popular tool for creating bootable USB drives, including those for Windows 10, on a Mac. It’s often chosen for its user-friendly interface and the wide range of ISO-related tasks it can perform. According to our test, you can run this app on macOS Sonoma without any issue. Our test machine is a MacBook Pro with M2 chip.
Here’s a basic rundown of how you would use UUByte ISO Editor to create a Windows 10 installation media on a Mac Sonoma:
1. Install UUByte ISO Editor: You can get this software from the following link. After downloading, follow the instructions to install the software on your Mac.


2. Download the Windows 10 ISO file: You can download this directly from the Microsoft website. Make sure to select the correct version that you need.
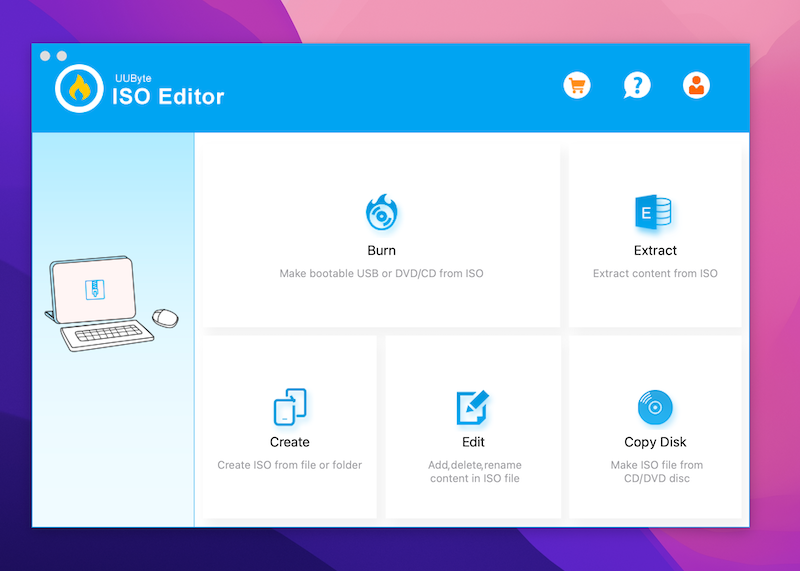
3. Launch UUByte ISO Editor: Once the software is installed, open it and you’ll see several options. For creating a bootable USB, you’ll want to select "Burn".
4. Select the ISO file and USB drive: You’ll need to locate the Windows 10 ISO file you downloaded earlier. Next, insert your USB drive and select it in the software. Make sure the USB drive has no important data, as it will be formatted during this process.
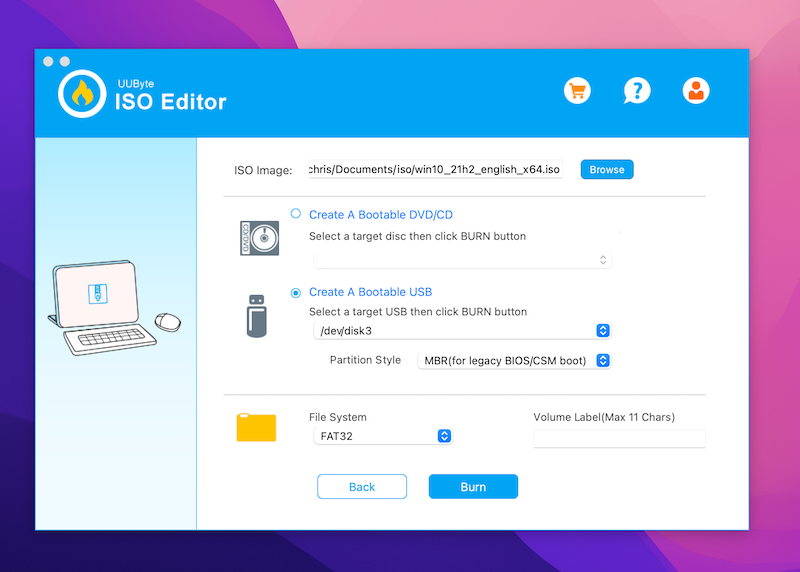
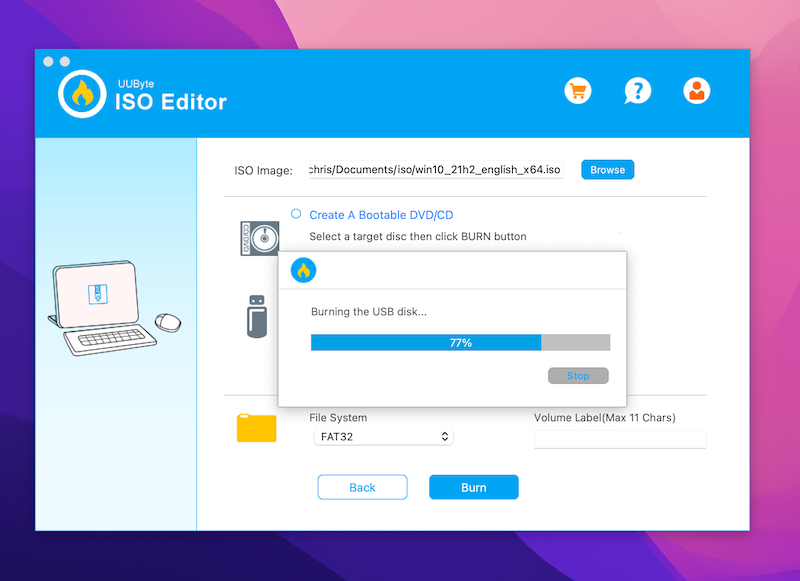
5. Create Windows 10 bootable USB: With everything selected, you can now proceed to create your bootable USB. The process may take some time, so be patient. Once it’s done, you’ll receive a confirmation message.
6. Boot the USB Drive from Target Machine: To ensure the process was successful, you can check the USB drive on your Mac. It should show up with the Windows 10 installer.
While UUByte ISO Editor is a robust tool, it’s always good to follow all the steps shared in above. Make sure the USB is well connected during the burning process.
The Advanced Way to Create Windows 10 Bootable on Mac Sonoma
The Terminal app in macOS is a powerful tool that gives users direct access to the UNIX operating system that underlies macOS. It allows users to navigate files, launch applications, and execute commands via a text interface, bypassing the graphical user interface of the OS.
You can use Terminal to create a Windows 10 bootable USB on Mac Sonoma, but the process can be quite technical and complex compared to using GUI-based tools like UUByte ISO Editor, Rufus, or UNetbootin. However, if you prefer to use Terminal, here’s a basic guide. Here are the steps to create a Windows 10 bootable USB on Mac Sonoma using Terminal:
1. Insert the USB drive into your Mac.
2. Open Terminal by going to Finder -> Applications -> Utilities, or by using Spotlight Search (press Command + Space, then type "Terminal").
3. In Terminal, type ‘diskutil list‘. This will list all the disks currently connected to your Mac. Identify your USB drive by its size and make a note of its identifier (e.g., disk2).
4. Format the USB drive by typing ‘diskutil eraseDisk MS-DOS "WIN10" GPT diskX‘, replacing diskX with your disk identifier. This command erases the disk, formats it as FAT, and renames it "WIN10".
5. Mount the Windows 10 ISO file. Type ‘hdiutil mount /path/to/your/iso, replacing /path/to/your/iso‘ with the path to your Windows 10 ISO file. This command will output the name of the disk the ISO was mounted to, make a note of this (e.g., /dev/disk3).
6. Copy the Windows 10 files to the USB drive. Input ‘cp -rp /Volumes/CCCOMA_X64FRE_EN-US_DV9/* /Volumes/WIN10/‘. This command assumes that CCCOMA_X64FRE_EN-US_DV9 is the name of the mounted ISO (which can change depending on the version of the Windows ISO file) and WIN10 is the name of your USB drive. Adjust accordingly.
7. Unmount the ISO and the USB drive by entering ‘hdiutil unmount /dev/diskX‘ and diskutil eject /dev/diskY, replacing diskX with the identifier of the mounted ISO and diskY with the identifier of your USB drive.
Now, you should have a bootable Windows 10 USB drive. Note that these steps involve complex operations and can potentially lead to data loss if not carried out correctly. Always double-check before executing commands that modify disks or files.
Remember, this method doesn’t include the necessary boot files for Mac. If you intend to boot a Mac with this USB, you would need additional steps to make the USB bootable on a Mac. If you intend to boot a Windows machine, the USB drive should work as expected.
The Alternative Way to Create Windows 10 Installation Media on Mac Sonoma
Our last recommendation is UTM, a free and easy-to-use virtual machine software on Mac Sonoma. The UTM (Universal Turing Machine) app is a virtualization platform for macOS devices that allows you to run multiple operating systems, including Windows 10, on your Mac.
With UTM, you can create a virtual machine (VM) and install Windows 10 within it. After that, run Windows 10 virtual machine on your Mac and there are tons of free tools available for creating Windows bootable USB on Mac Sonoma, such as Rufus, Windows Media Creation Tool. Here’s an overview of UTM and how to use it to make a Windows 10 installation media on Mac Sonoma:
1. Download UTM: Go to the App Store on your iOS device and search for "UTM – Virtual Machines." Download and install the UTM app.
2. Prepare a Windows 10 ISO: To install Windows 10 on UTM, you’ll need a Windows 10 ISO file. You can obtain this from the official Microsoft website or through other legitimate sources.
3. Import the Windows 10 ISO: Launch the UTM app on your iOS device. Tap the "+" button in the upper-right corner to create a new virtual machine. Select "Import" and choose the Windows 10 ISO file from your device’s storage. UTM will import the ISO and prepare it for installation.
4. Configure virtual machine settings: After importing the Windows 10 ISO, you’ll need to configure the virtual machine settings. This includes specifying the amount of memory, CPU cores, and storage space to allocate for the virtual machine. You can also adjust other settings like display resolution, network configuration, and more.
5. Start the virtual machine: Once you’ve configured the settings, tap "Start" to launch the virtual machine. UTM will load the Windows 10 installation process within the virtual machine.
6. Install Windows 10: Follow the on-screen instructions within the virtual machine to install Windows 10. This process will be similar to installing Windows 10 on a physical computer. You may need to format the virtual hard drive, select the installation partition, and provide necessary setup information.
7. Complete the installation: Once the Windows 10 installation process finishes, you’ll have a fully functional Windows 10 environment running within UTM. You can interact with Windows 10 using the virtual machine’s display and input controls.
8. Create Windows 10 Bootable USB in Windows 10 VM: Once the Windows 10 installation process finishes, you’ll have a fully functional Windows 10 environment running within UTM. You can interact with Windows 10 using the virtual machine’s display and input controls. Finally, download Rufus or Windows Media Creation tool to make a Windows 10 installation media.
Please note that UTM provides virtualization capabilities on Mac devices, but it may have certain limitations compared to running Windows 10 on a dedicated computer. The performance and functionality may vary depending on the device’s hardware and the resources allocated to the virtual machine.
Video Guide: Create Windows 10 Bootable USB on Mac
Our Final Words
Creating a Windows 10 bootable USB on a Mac can be accomplished using UUByte ISO Editor, Terminal, and the UTM app. These tools provide different approaches to achieve the desired outcome.
UUByte ISO Editor offers a user-friendly graphical interface that simplifies the process of creating a bootable USB drive from a Windows 10 ISO file. It provides step-by-step instructions and takes care of the formatting and copying of files, making it an accessible option for users who prefer a GUI-based solution.
Terminal, the command-line interface on macOS, provides a more traditional and powerful method for creating a bootable USB drive on Mac. By using commands such as ‘diskutil’ and ‘cp’, users can format the USB drive, copy the Windows 10 ISO contents, and create a bootable drive with precise control.
The UTM app offers a unique approach by allowing users to run a virtual machine on Mac devices. While it does not directly create a bootable USB, it provides the ability to install and run Windows 10 within a virtual machine environment. This can be an alternative solution for users who want to experience Windows 10 on their iOS devices.
Each method has its advantages and considerations. UUByte ISO Editor offers simplicity and ease of use, Terminal provides flexibility and control through commands, and UTM enables running Windows 10 on iOS devices. Users can choose the approach that aligns with their preferences and requirements.