macOS Big Sur is one of the most advanced operating systems existing in the world so far. macOS is getting popularity due to having a lot of new features such as custom browsing layout, cross-browser compatible extensions and elegant tab designs. But you might be wondering, how to create a bootable macOS Big Sur USB so you can test it out.
Here is the solution to make your task easier to access the new macOS Big Sur. You can follow the process given to create macOS Big Sur bootable USB installer on Mac. All you need a 16GB USB drive and downloaded file of macOS Big Sur. Since after the launch of Mavericks, the creation of bootable USB on Mac has become easier, and here you will get the best 3 ways to create bootable USB for Big Sur.
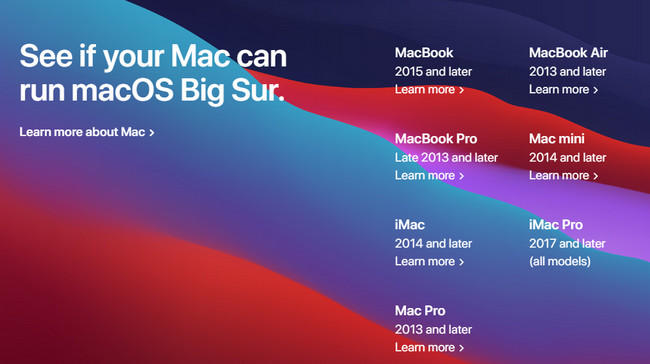
Now, you are well aware of the requirements you need for creating macOS Big Sur bootable USB on Mac. So, before moving to the process, you must be confirmed whether Big Sur will support your Mac or not, and for that, you can check the supported list that is available on the Apple site.
#1: Create macOS Big Sur Bootable USB via Terminal App
#2: Create Bootable macOS Big Sur USB with DMG Editor
#3: Use Virtual Machine to Create macOS Big Sur Bootable USB
In this method, we will perform this task via commands in Terminal app, which is the equivalent of Command Prompt in Windows. Before proceeding to the actual steps, you should be very careful when executing the commands. If you did this wrong, the internal disk will be damaged and break the Mac. Initially, you will go through the USB drive erasing process and then you can create macOS Big Sur bootable USB installer via a single but long command.
Step 1: Insert USB drive on your Mac and make sure the minimum storage capacity of USB should be 16GB.
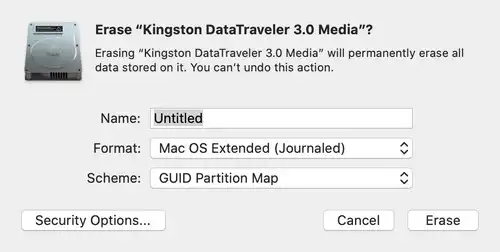
Step 2: Open Disk Utility app and here you need to make a few changes. First select the USB drive then move to the Erase section at the top menu. Now, select Mac OS Extended (Journaled) from the drop-down menu. After that, go to the Scheme section and select GUID Partition Map.
Step 3: After making all the changes mentioned above, click on the Erase button and then close the Disk Utility window.
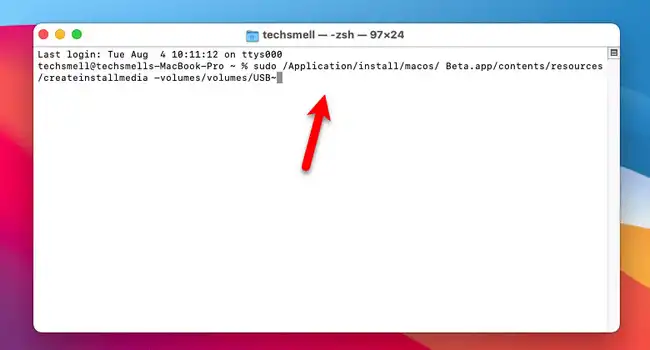
Step 4: Now, launch Terminal on your Mac and then type the command listed below.
sudo /Applications/Install\ macOS\ Beta.app/Contents/Resources/createinstallmedia --volume /Volumes/USB
Step 5: Press the Return key and if any pop-up window appears seeking for the admin password, then provide the same.
Step 6: Now the process will start and it will take some time, so have patience. Once, it is completed, you will get a successful message on your Mac screen. After that, remove the USB as it is ready to boot now.
Creating bootable Big Sur installer in Terminal is the conventional method being recommended by technical experts. The whole process runs through text commands and it gives the utmost result. However, this method is good for those users who are a bit familiar with commands. However, if you are not comfortable with the commands, you can follow the other methods in this post to make a bootable macOS USB drive.
Honestly, most of the Mac users prefer using GUI app to complete tasks on their and people get used to mouse clicks. So in this part, we will abandon commands and use a modern app to create a bootable macOS USB drive.
UUByte DMG Editor is a powerful and most demanding software because of its features. UUByte can support multiple file formats in the burning process such as DMG, ISO, BIN, ZIP, and many more. The tool can burns any image file on the USB drive in a short time and make it bootable after burning. So you can easily create bootable macOS Big Sur USB on your Mac.
Download and Install UUByte DMG Editor on your Mac. Next, open the installed application and also insert the USB drive on your Mac. If you received a warning message when trying to open it from Lanuchpad, please go to Application folder, locate the app name and right-click on it. After that, select "Open" to run the app.
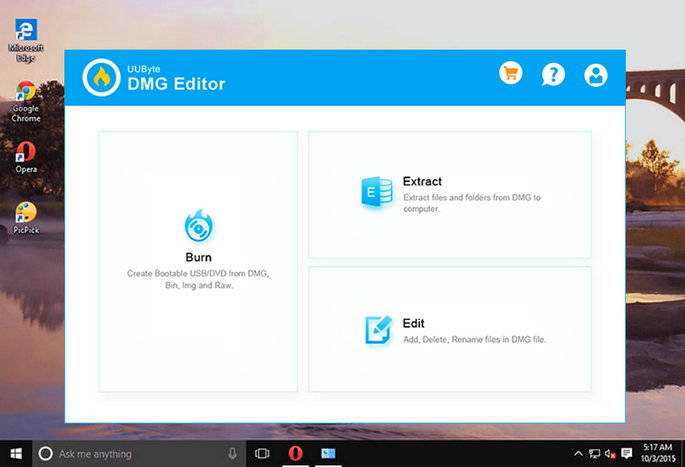
On the home page, you will get the burning feature. Click on the "Burn" button and it will direct you to the next page, where you need to upload the macOS Big Sur DMG file.
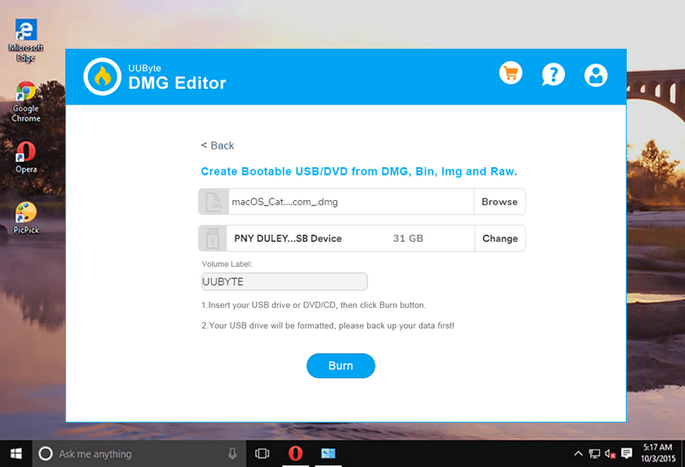
Now, verify the location of the USB drive and if it is not showing in the DMG Editor interface, then remove USB and insert it again. If everything is fine, then click on the "Burn" button.
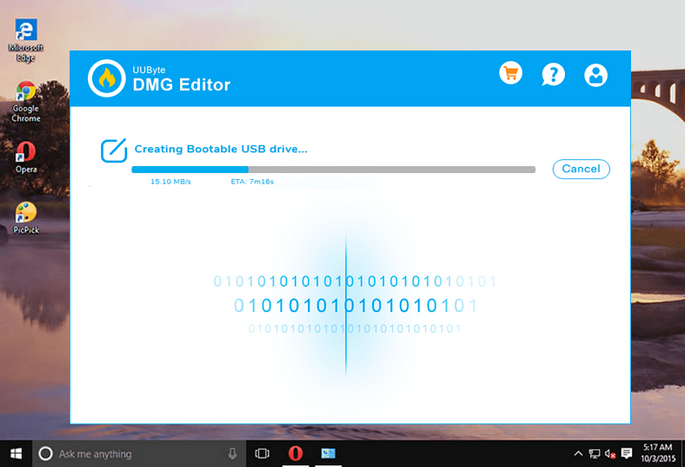
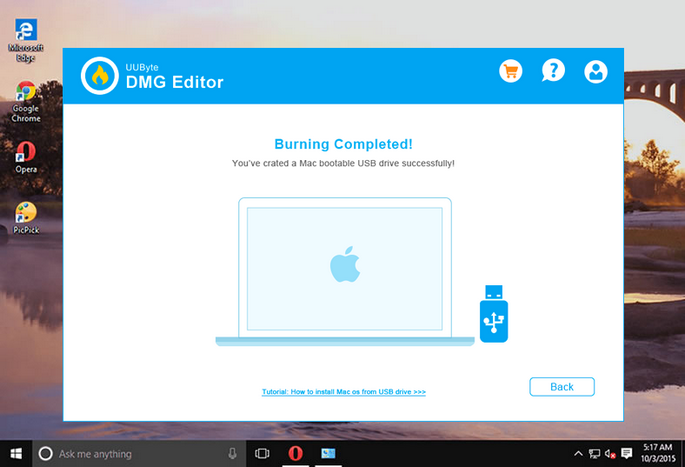
The burning process is commenced and it will be completed in several minutes. Once the bootable process is completed, close the application and remove the USB drive. Now, you can use this bootable USB to install macOS Big Sur.
UUByte DMG Editor has unique burning features and a smooth interface. Apart from image burning function, it also extracts content from dmg file and enables the users to view and make changes in such file format. So, this tool is a complete package that gives full authority to create bootable macOS USB installer on Mac.
If you built a Windows virtual machine on Mac, then you can use TransMac (Windows only app) to create Big Sur bootable USB. TransMac is a software that enables the users to manage .dmg image file on Windows PC. Moreover, it has the potential to restore the DMG file of any macOS including Big Sur to USB drive. So, you can use this tool to perform the task in a Windows virtual machine.
Step 1: Download and Install TransMac on a Windows virtual machine.
Step 2: Insert the USB drive on the Mac and then run TransMac in administrator mode.
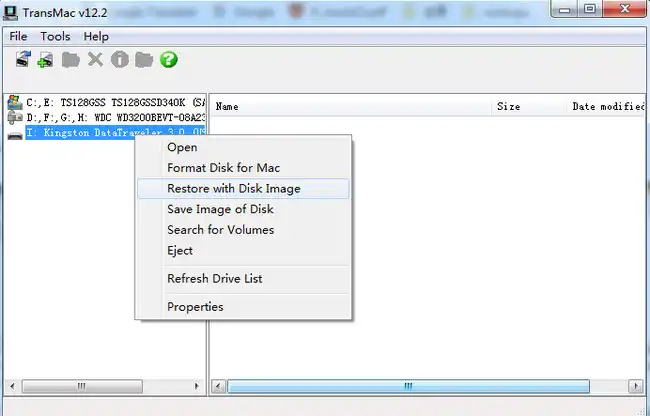
Step 3: At the left panel of TransMac, you will get the list of drives, select USB stick and then right-click on it to choose to "Restore with Disk Image" option.
Step 4: You will get the pop-up window giving you the warning, read it carefully and further click on the Yes button.
Step 5: Now, click on the "Browse" button and import Big Sur file on TransMac and then click on the OK button. TransMac will start the operation. In the beginning, it will erase the USB drive, and later on, it will burn the dmg file on USB drive and the entire process will take some time.
TransMac is another popular software for making bootable macOS Big Sur USB drive. However, it is a big expensive ($59.95) than UUByte DMG Editor. And you should build a virtual machine first. Although this is a working solution, it takes more time and money to finish the task.
These are the best three methods to creating macOS Big Sur bootable USB on Mac. Using UUByte DMG Editor is a lot of simple and any users can accomplish the task by his/her own. However, if you are tech-savvy, then you can go with the Terminal app. However, if you are a beginner, then you can choose UUByte DMG Editor or TransMac. So, everything is in your hands now and you can choose the method which is more convenient for you.
![]()
![]()
![]()
![]()

