Creating bootable Windows 7 USB is super easy on a Windows PC. You can pick up the best from dozens of ISO burning software like Media Creation Tool developed by Microsoft. You won't be such lucky on a Mac computer, especially on latest macOS Catalina, which retired burning feature in Disk Utility app.
The fact is that the USB is not bootable by pasting the ISO image or extracted folder to USB. That's why we need special programs to do that. There are a limited number of utilities available on Mac for this purpose. Please follow the suggestions in below to create a Windows 7 Bootable USB on macOS Catalina. Before getting started, make sure you already downloaded Windows 7 ISO file on a macOS Catalina.
Create Windows 7 Bootable USB on Mac #1: UUByte
Create Windows 7 Bootable USB on Mac #2: balenaEtcher
UUByte ISO Editor is a popular program for creating bootable Windows USB on PC. And recenly, the developer released the Mac version to public. This means you can use the same features on a Mac without limitations.
UUByte ISO Editor for Mac is a simple to use software that comes with beautiful user interface. Plus, The functions are easily understandable and you know how it works at first glance. Besides, this Mac ISO burner has several other powerful features for different ISO tasks, including edit, create and extract, making it a perfect tool for handling ISO files.
Download the Mac version of UUByte ISO Editor on Catalina and install the app. Insert a blank USB in the mac and launch the UUByte app.
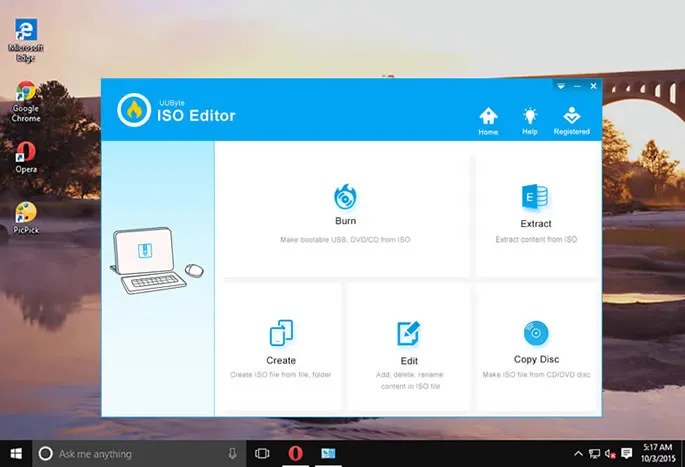
On the interface of the UUByte ISO Editor tap on the 'Burn' icon from the options. It will lead you to a screen where you will need to browse & select the Windows 7 ISO file from downloads.
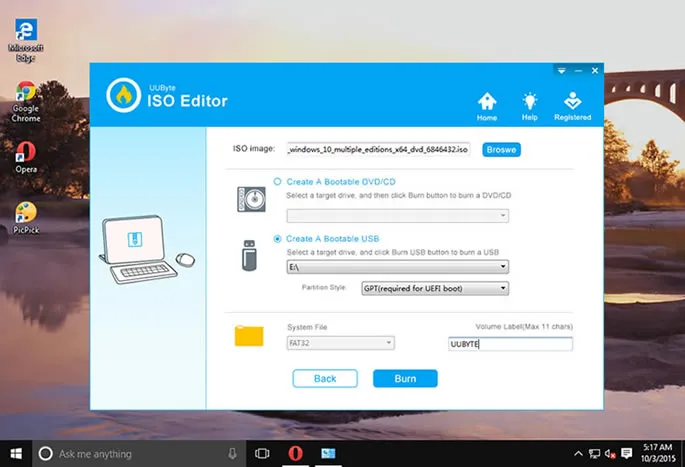
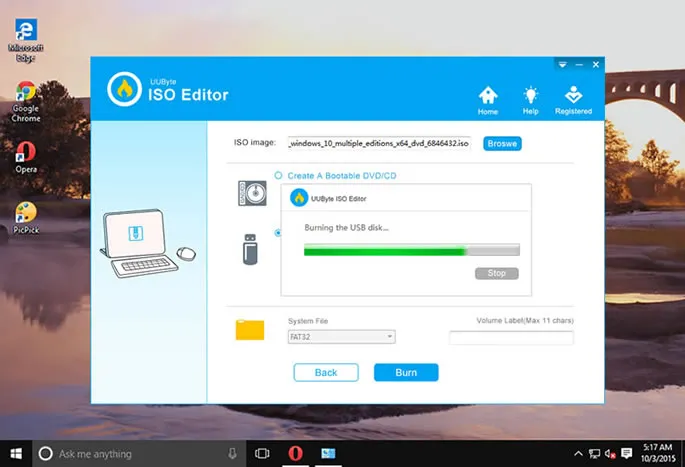
Select your USB drive from the drop-down menu and hit 'Burn' button to start the process of creating Windows 7 bootable USB. Please wait and don't let the Mac getting into sleep until you see a message, saying 'burning successfully'.
The speed and the uncomplicated process make UUByte ISO Editor a favorable option especially when there is urgency. And most importantly, UUByte ISO Editor is fully compatible with latest Windows and macOS.
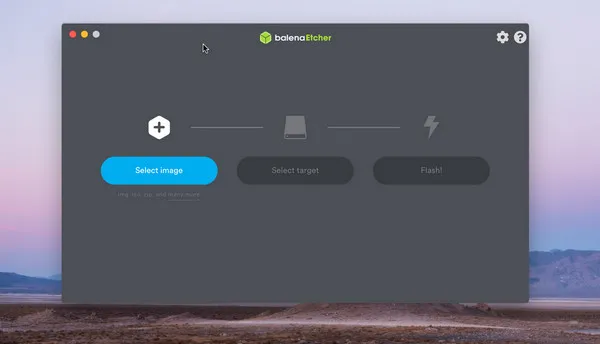
Initially, Etcher is a stand along utility developed by balena team to flashing customized Linux OS to SD card for single-board computer, like Raspberry Pi, Arduino. Later, the author open sourced Etcher project on GitHub and many new features are added to this software. Now, you can use this cool app to create Windows 7 bootable USB on Mac by burning Windows ISO to USB. It is completely free and has an ultra simple user interface.
Step 1: Download Etcher installation file for macOS from the download section of Etcher official website.
Step 2: Insert a blank USB to Mac. On the interface of Etcher, hit the 'Select image' button and browse to load Windows 7 ISO file into the app.
Step 3: Select drive name of USB drive you just plugged in and then Hit 'Flash' button to start burning Windows ISO to USB.
Although it is very easy to use and the user interface is amazing, there have been reports of the tool malfunctioning quite a few times. And the burning time is much longer than UUByte ISO Editor.
Boot Camp is a built-in free utility that comes preinstalled with macOS Catalina. Its purpose is to reduce the time Mac user spend on tha task for installing Windows OS on a Mac. It is a reputed app developed by Apple but has major issues with Windows 7 ISO at sometimes, so we don't recommend it at first place to avoid wasting your time. However, it is still a legit solution to create Windows 7 bootable USB on Mac.
Step 1: Type 'boot camp' in search bar to locate the app from Lanuchpad. Click 'Continue' button when Boot Camp Assistant is running. Now, you need to select a task from next Windows. Make sure check the option named 'Create a Windows 10 or later install disk'.
Step 2: Insert an USB drive and tap 'Continue button again to get into the burning Window. Boot Camp will automatically search Windows ISO file from the downloads folder. If the file is not at there, then click 'Choose...' tab to import Windows 7 ISO into the app.

Step 3: Select 'Continue' icon only when you are sure of the operation. Because this will start the flashing process and erase all data on target USB. The USB name changes to WININSTALL after the formatting process is done. Close the window once done.
Boot Camp Assistant is extremely convenient for Mac users as it does not require you to download anything additionally. However, "Bootable USB cannot be created" is a common error that users have been facing while using Boot camp to create Windows 7 bootable USB on Mac.
VirtualBox is a powerful application that allows a host machine running a different guest OS at the same time. We can create a Windows virtual machine on Mac and create a bootable Windows 7 USB drive within the virtual machine, where you can get a bunch of free tools for doing that. It is free but takes tremendous time to finish the task.
Step 1: Download VirtualBox on macOS Catalina. Open the folder and double-click on the VirtualBox.pkg named file to install the app. Once installed, launch the app open. Also, download the Windows 7 ISO file to continue to the next step.
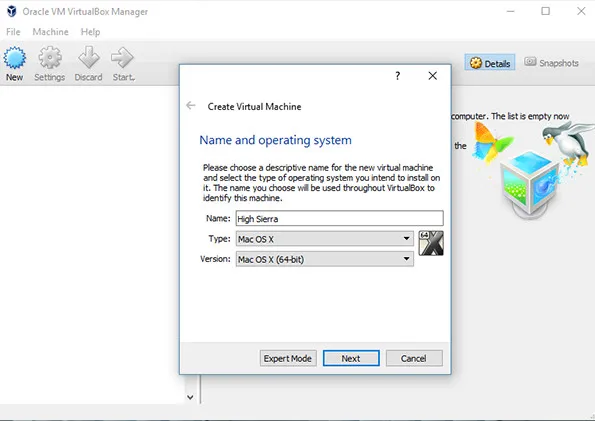
Step 2: On the interface of VirtualBox, click 'New' menu located at the top to start creating a new virtual machine. Now, giave the new virtual machine a name and select the OS type and version.
Step 3 : Import Windows 7 ISO image into the app and follow the prompt to finish the creation process.
Step 4: Now insert USB drive to Mac and switch to Windows 7 virtual machine. Once getted in, download Media Creation Tool and run the app. After accepting the license terms, select the option for creating installation media.
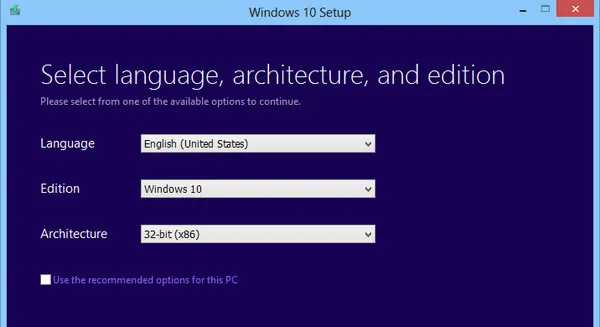
Step 5: In the next screen, change the Edition to Windows 7, Language to English and Architecture to 64-bit. Select the USB Flash Drive in the next screen and hit next to select the drive. Hit next for the final time and wait for the progress to complete.
Creating a Windows 7 bootable USB on Mac is not a simple task. Most of the tools fail on latest macOS Catalina. While some methods in the list are complicated and long, others face errors. This is why UUByte ISO Editor serves as the best option. The reviews are excellent and one can be sure of the disk to not face booting issues again. It truly saves a lot of time and makes the process look very simple with its convenient user interface.
![]()
![]()
![]()
![]()

