Google has already pushed out the beta version of the long-awaited Android 10.0 Q. The public release will be someday later in this year. If you were a Android developer or comfortable with new things, then it's time to learn how to install Android Q Beta on an Android device.

Security is the first thing Android has improved, with better biometric authentication that allows a user to specify when to stop asking for further authentication when one has been invoked, such as face recognition. You will also be able to quickly fall back on PIN, password or pattern authentication in case you are unable to use biometrics for any reason. In addition, an app can now automatically check if biometrics are available prior to invocation. Android Q also brings TLS 1.3, a more secure version of the communications security protocol.
Google has also brought in call quality and Wi-Fi quality improvements with this latest iteration of Android, as well as significant changes to UI and features like auto-fill. Overall, there are quite a few user-focused changes in the way apps behave and how they interact with the user.
As of now, Google only lists Pixel smartphones as eligible devices. However, if you're enrolled to Android Beta Program, your device could be listed very soon. With the previous iteration, Android 9.0 Pie, public beta versions were announced for several brands, including Xiaomi, Sony, Oppo, OnePlus and many others. Obviously, the hardware has to match the minimum requirements for the Android Q beta. Since the original Pixel is eligible, here are the assumed requirements:
We'll know more about minimum specs once the eligible devices list starts to include brands other than Pixel.
Android is now owned by Google so the new beta program is always available for Google Pixel device at first. The eligible Pixel devices that are already registered for the beta program can get OTA (Over-The-Air Update) in default. For other brands of Android devices, users need to download and install the update manually. It will be covered in next setion.
On Pixel phones, you should get an automatic update notice on the main screen. Tap on the notification or go to Settings > System > Advanced > System Update. If you're not just signing up, then you can do it at here. Once you're on the program and have installed the first beta, future updates will be available for the device over the air.
![]()
You can also use the traditional approach and flash Android Q update to eligible Android device. For that case, you will need to follow the process outlined below.
Warning: All data will be wiped out on your device when you flash a new OS version, so be sure to take a full backup before beginning this process.
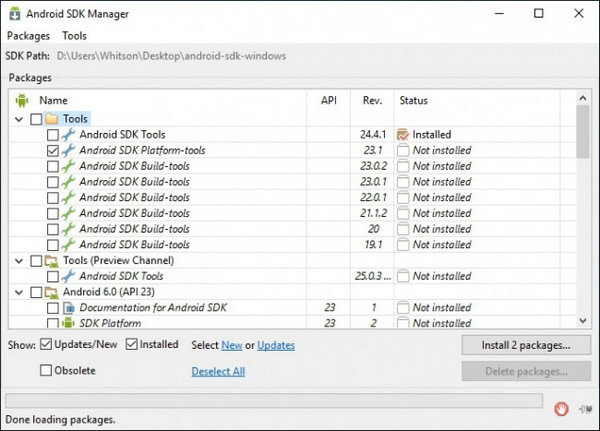
Step 1: Download Android SDK on a computer from here. From the SD Manager, download Android SDK Platform-tools and Android Q Beta. What you need are the adb and fastboot files, which you can find in the folder called Platform Tools.
Step 2: On Android device, go to Settings > About Phone and tap on Build Number seven times in succession. You should be able to see a message saying you are now a developer. Now go back to Settings and tap on Developer Options to turn on USB Debugging.
Step 3: Connect Android device to the computer and click on OK when asked to Allow USB Debugging.
Step 4: In this step, we are going to unlock the bootloader. Hold down the Volume Down and Power buttons to get into the bootloader menu. Alternatively, on your computer, open Command Prompt and enter the following command: ./adb reboot bootloader
Step 5: Now unlock the bootloader with the following command: ./fastboot flashing unlock

Step 6: Confirm the unlock by first pressing the Volume Up button followed by the Power button.
Step 7: Reboot the bootloader again with the following command just to confirm that everything is fine:
./fastboot reboot-bootloader
Step 8: To flash the updated bootloader, use the following command:
./fastboot flash bootloader [bootloader file].img
Step 9: To flash the Android Q Beta Update, type this command: ./fastboot -w update [image file].zip
If you see the device set up on Android screen after it reboots, that means you have successfully flashed Android Q Beta on a non-Pixel device.
![]()
![]()
![]()
![]()