How to Recover Deleted or Lost Photos from Android Phone

Jan . Posted by to Android Topic

You must feel upset and do not know what you should do when the photos on Android got deleted accidentally, especially for those precious ones. Actually, you do not need to worry too much nowadays because there are several means you can take advantage of to recover the deleted or lost photos on Android phone. In fact, there are many softwares that can recover deleted photos Android phone, the article is easy for you. Firstly, you have to know where those pictures are saved and what reasons may cause the data loss, such as:

1) Accidently deleted important files or infected the phone virus.

2) Factory settings restore, rooted your device and lost data.

3) The data was disappeared after a ROM flash.

4) Data are inaccessible when Android phone is broken or water damaged.

5) Accidently formatted Android phone or SD card was corrupted.

If these situation were happened to you unfortunately, but don't panic! It may seem to be lost. You personal data is almost certainly still on your phone's internal memory or SD card somewhere. For deleted photos, in fact that it won't be really erased completely when you delete a photo on Android device, it is still remain there. From the storage's point of view, the deleted file is no longer displayed on your Android storage and the sectors containing its original data are considered free space. But it still can be recovered by professional Android recovery program as long as the original data was not overwritten by new data.

Because different users may store data in different place, internal memory, SIM or SD card, you must use a data recovery tool that supports the identification of different storage medium you are using. So, when choose a Android photo recovery tool, please make sure that it must be specialized as to the type of media it can handle and identify different storage medium.


#1: Recover Deleted Android Photos from Trash Can

On modern Android phones, there is a Tash folder where deleted photos are moved to there for the first time the Delete button is triggered. Usually, the deleted photos will sit there for 15 days. After that, they will be deleted permanently from the phone. Before using any photo recovery app or software, you should first check the Trash first. Below is an example of Samsung Galaxy S10.

Step 1: Launch Gallery app on Galaxy S10 and tap the three dots to open photo settings.

Step 2: Tap Trash from the pop-up window, which leads you to the trash folder.

Step 3: Now select the images you wish to recover and click on the Restore button at the bottom. Then the deleted photos will go backup to Gallery app.

Restore Photo from Trash Bin S10

This is a fast and simple way to recover deleted photos on Android. However, it only works on images that haven't been permanently deleted. What's more, these deleted images only last for 15 days in the Trash folder. This means that older images can not be recovered in this way. If you want a more comprehensive solution, read on.


#2: Recover Deleted Photos from Android Using Androidphonesoft

To get the best chance of a successful photo recovery you just need to choose the right tool for the job. In here, will use Androidphonesoft Android Data Recovery as an example to restore lost pictures from Android smartphone or tablet. The reason why choosing Androidphonesoft is that this program has a powerful data recovery engines, which is able to retrieve deleted photos from internal storage or SD card.

What's more, you can easily preview the deleted photos before recovery. Finally, the user interface is the best among its competitors. No one would have any issue in using this program. The following part will explain how it works in details.

Win versionMac version

Step 1 Install Android Data Recovery on a Computer

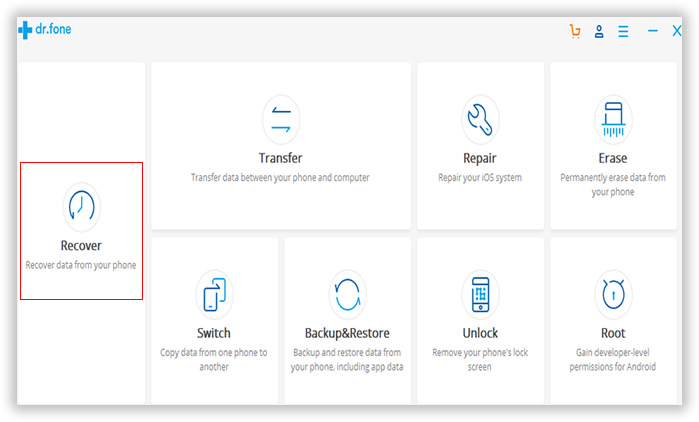
This will be a four-step tutorial which shows how to restore photo and other files from your Android memory card. Before recovery, please make sure you have downloaded and installed this program. Click Recover button once the program is opened.

android recovery main

Step 2 Connect Phone to PC

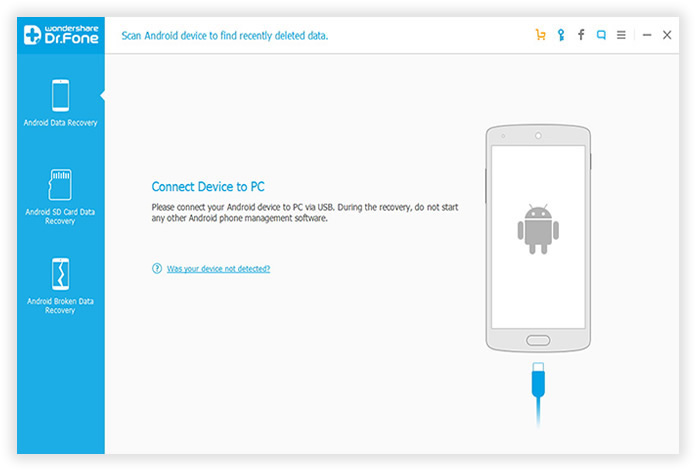
At the new screen, you need to plug Android phone to the computer. Currently, you can do this with a USB cable.

Android recovery connect

Step 3 Enable USB Debugging on Your Android Device

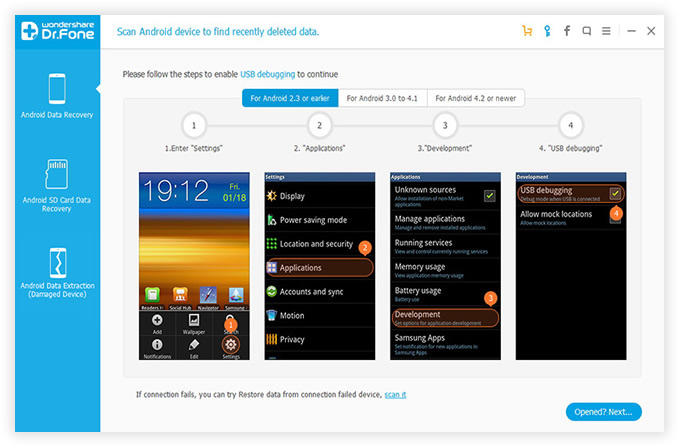
At this point, it requires you to enable USB debugging on your Android device so that the program can access your Android storage system. Maybe different system have different debugging settings, here we show quick access to enable USB debugging mode.

recover Android internal memory

Step 4 Analyze and Start Scanning for Recoverable Photos

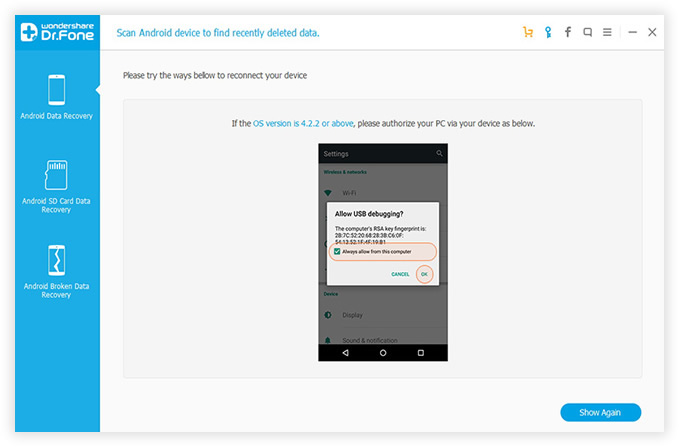
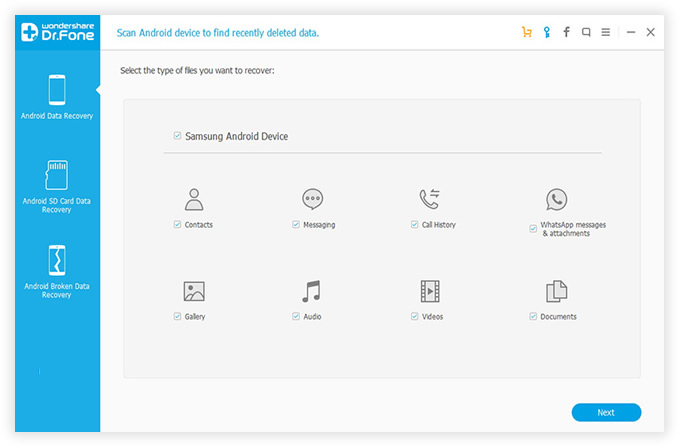
Once your computer detects your Android device, click Next in the software's interface. Then on your Android homescreen, click OK to allow the program super user authorization when an Superuser Request pops up. Click Start to analyze and start scanning for recoverable photos.

Analyze and Scan Your Android Internal Memory

It will take a few times to finish the whole scanning process according to the storage of data. During the scanning, don't disconnect your phone with computer and make sure that the battery is more than 20% before you start, or the scan will fail.

scan lost files on internal memory

Step 5 Preview and Start Recovering Data from Android Internal Memory

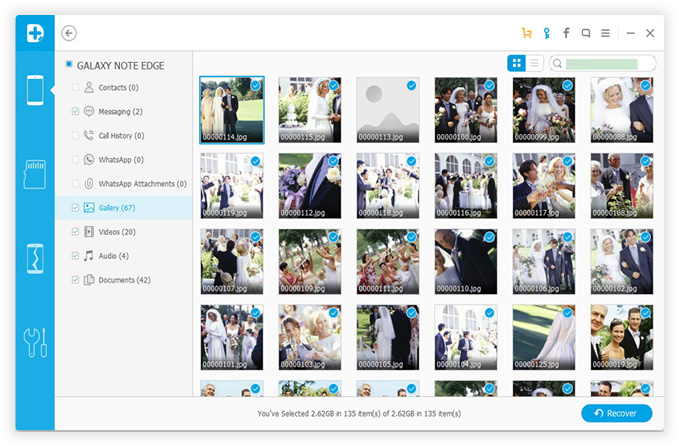
After scan is complete, you can browse and preview the files listed in the original tree structure of the Android phone. Both deleted and existing data are displayed, the red color represents deleted data. After preview, mark the files you want and click Recover . Then choose a save path on your PC to save them. 

preview lost photos on Android phone

Above all, if the data was deleted or lost a long time ago, or if your Android phone was damaged, repartitioned or formatted then this full Android Photo Recovery tool will become essential. You should now understand why deleted photos can be recovered and when they can't. So to meet the requirement of reducing unnecessary losses, it's essential for you to regularly back up important data to PC.

Win versionMac version

#3: Recover Deleted Android Photos from Google Drive

The Android ecosystem is a fairly vast and comprehensive one. When you use Android phone, you will have access to a range of other services that give you a more holistic experience. For instance, you can back up all your images in Photos to Google Drive and even create a custom folder for it. Your phone will then regularly back up all photos to the drive, which means that if you accidentally deleted photos on Android phone, it is quite easy to recover the photos from Google Drive.

Step 1: Launch your Google Drive app and login with the same Google account that you use for your backup.

Step 2: Access Photos folder and view all your images.

Step 3: Select all the pictures that you want and hit the Download button.

Step 4: Once the download completes, you will find that all your photos have now been recovered and are now available on your device.

Recover Photos from Google Drive

It is always advisable to use cloud storage as a backup for something as important as photos. However, these sort of scheduled backups happen at fixed intervals. This means at any given time, there might be some recent images that are not backed up in your drive. As a result, you might not be able to recover all photos. In this case, you might need more specialized solutions.


#4: Recover Deleted Android Photos Using FoneLab for Android

Fonelab Android Data Recovery has been crafted expressly to help you recover deleted files from Android device. One can almost call it a master recovery software that can help you restore everything from lost photos and videos to music and messages too. Here's how you can use it to restore your photos.

Step 1: Download and install Fonelab on a computer from this link.

Step 2: Connect your Android device using a USB cable and launch the software on your computer

Step 3: Let Android Data Recovery automatically read and detect your phone. You might have to enable USB debugging on your phone, to do so just follow the on screen instructions.

Step 4: Once you move on to the next screen, you will be asked to select the data type that you are trying to recover. Choose photos.

Step 5: On the next screen, you will be shown all the deleted photos on your device. You can view additional details about each photo as well. Use this page to find the photos you want to recover and select them. Click Recover button and let the software do its job.

FoneLab Android Recovery

Fonelab is a versatile recovery tool that can help you restore everything from photos to emails and WhatsApp messages. Think of it as one massive undo button for your device. What's more, it does so via simple and easy-to-understand interface. It should definitely be one of your top choices when it comes to picking a recovery method for Android device.


#5: Recover Deleted Android Photos Using Litemaster App

Litemaster's Photo Recovery app is one of the most widely used apps when it comes to recovering lost photos on an Android device. It can be easily downloaded directly from the Play Store onto your phone and has a simple and easy to use interface. Here's how you can use it.

Step 1: Start by visiting Play Store on your Android phone and download the app.

Step 2: Launch Photo Recovery on Android phone.

Step 3: Hit the Scan button and let the app scan for all the deleted photos on your device.

LiteMaster Photo Recovery

Step 4: You will now be shown a massive list of all the deleted images on your device. Select all the photos that you wish to recover and click the Restore button.

Photo Recovery is a fairly reliable software when it comes to restoring lost Android images. It also comes with the added benefit of not requiring a computer or any other system. One can simply download it on one's Android device and let it do all the work.


Summary

In general, Androidphonesoft Android Data Recovery seem to be the best tool out there when it comes to lost Android photos. They are both versatile and give good results. If you can recover deleted photos from Trash, you should always do so. But if not, you do have these two solid options to fall back on.


Sophia Lee

Sophia Lee

Senior editor

Sophia is a senior editor of Androidsoft. She discovered the fascinating world of Android and constantly share the most practical tips and tricks for Android users.

Hot Product


Android data recovery