One of the main reasons to erase all content from your Android phone is when you are selling or donating your phone or your device's performance becomes slow. With HTC One M9, you do get very high specifications but in case if you like to upgrade your phone or want to switch to some other brands then you may consider selling or giving it away to the next person. In that case, you must delete all data from your phone before handing it over to a total stranger.
Tip: In this guide, we will show you how to reset and erase data from HTC One M9. By performing these methods, all data from your phone including pictures, music, videos, messages, contacts, etc. will be removed from your device. Any content saved on your Google account can restored again when you sign in but all application data will be erased and they cannot be recovered. It is highly recommended to create a full back up before deleting anything from your phone.
Method 1: Erase All Data on HTC Phone with Factory Reset
Method 2: Permanently Wipe HTC Phone with Android Data Eraser
When you came across problems on your HTC phone and they wouldn't be fixed by your own, then a factory reset is the best way to solve all kinds of issues. It is also a simple way to erase personal data. To perform factory reset on your HTC One M9, please simply follow these steps.
Step 1: Tap on Menu and start the "Settings" menu or swipe down from the top of the screen and click on the small gear icon to open settings.
Step 2: Underneath the "Personal" section, tap on "Backup & reset". You may be asked to enter the PIN or pattern or password.
Step 3: Now, tap on "Reset phone ".
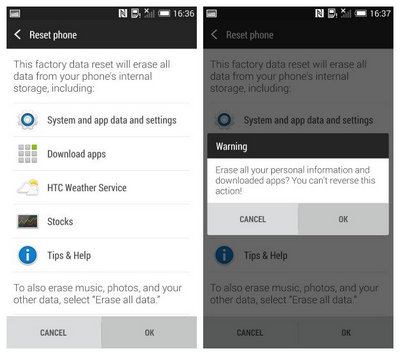
Step 4: You will be able to see a bunch of information and under all that, you will see an option that says "OK". Touch on that once. This will delete everything from your phone including all content and settings. When the operation is completed, reboot the phone once and you should see an empty phone with stock applications only.
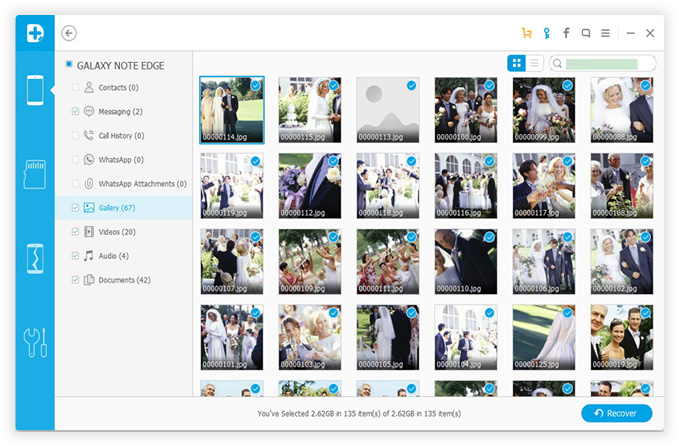
While this process is only able to mark all existing in hidden state, which means the data is not deleted permanently. These files can be recovered easily with the help of professional Android data recovery software. And if anyone succeeds to retrieve all personal data from your phone then it will compromise the privacy and security of all contacts and other personal information that were stored on your phone. Here is the scanned result of factory reset Android phone:
Thus, in order to completely remove everything permanently from your HTC phone, you should use a professional data erasing program. In the next method, we will be using Android Data Eraser to delete everything from your phone.
Android Data Eraser is a professional data erasing program that uses military-based algorithms to delete all content and settings from Android devices. It will write a set of random data to the disk without any rule, making it impossible to recover any data from the device. It supports all the HTC smartphones as well as Samsung, LG, Sony, etc. This software is very simple to use and you can delete all data from your phone with just few clicks.
Advantages of using Android Data Eraser:
Download Android Data Eraser from the official website and install it on your computer. Next, launch the program and you will see the main window of this tool.
Connect your HTC phone to the computer by using a USB data cable. The software will automatically detect the phone and show it on the computer. If not, then you should check whether USB debugging is enabled or not.

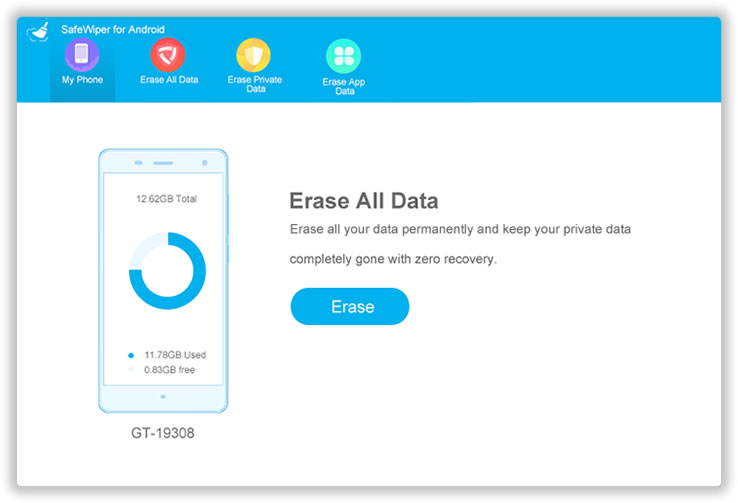
Now, click on "Erase All Data" and on the following page, you will be asked to type 'Delete' to confirm that you are ready to permanently erase all data from your phone. Upon confirming, the software will start deleting everything from your phone. Make sure to keep it connected with the PC until the process is finished to avoid any interruption.
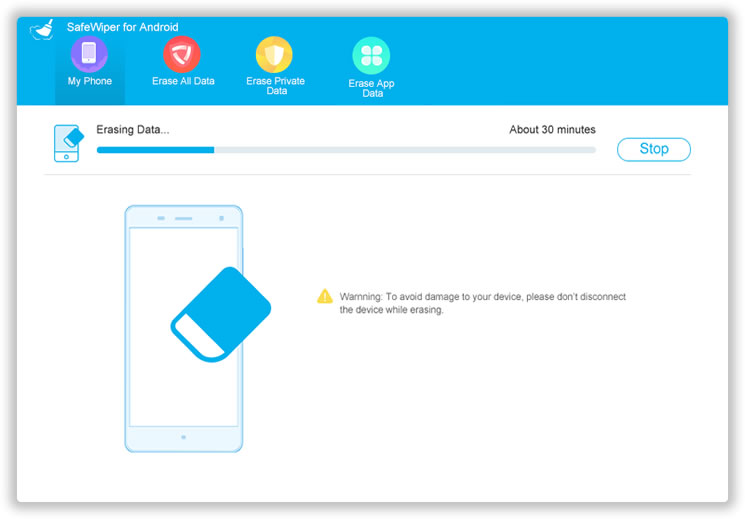
As soon the deletion process is finished, the software will ask to factory reset the phone. It is recommended to do that to reset all settings from your phone. After it is done, you will be able to see the following message which indicates everything is deleted from your phone permanently.
Conclusion: Erasing data from your phone is necessary if you are selling or giving it away and to maintain the security and privacy of your personal data, you must take one step ahead and try to remove everything permanently. You may consider Android Data Eraser to delete all data from your phone as the deletion process using this software is permanent and cannot be reversed.
![]()
![]()
![]()
![]()